Why Motorcycle Vest Patch Placement Matters
Motorcycle vest patch placement is the part most riders get wrong. They measure once, eyeball the rest, and stitch a rocker crooked. Then it's permanent, or it's an ugly scar on leather. Placement isn't a style choice you make on a whim. It follows tradition, and tradition exists for a reason.
So what's the short answer? The top rocker goes across the upper back, the center patch sits directly under it, and the bottom rocker runs below the center. Everything on the front goes on the chest panels. That's the layout. The details are where people trip.
Where the Layout Came From
The three-piece back layout comes from motorcycle club tradition, and it's been around since the late 1940s. Veterans coming home from World War II built clubs around their old units, and the patch layout borrowed from military insignia. The American Motorcyclist Association formed back in 1924, and riding groups were already using emblems before the war. The full vest system got standardized after.
You can look up the basics on Wikipedia under motorcycle club, and the general layout is documented in enough places that nobody should be guessing. But clubs guard their specific rules. If you're joining a club, ask before you stitch anything.
The Main Types of Back Patch Layouts
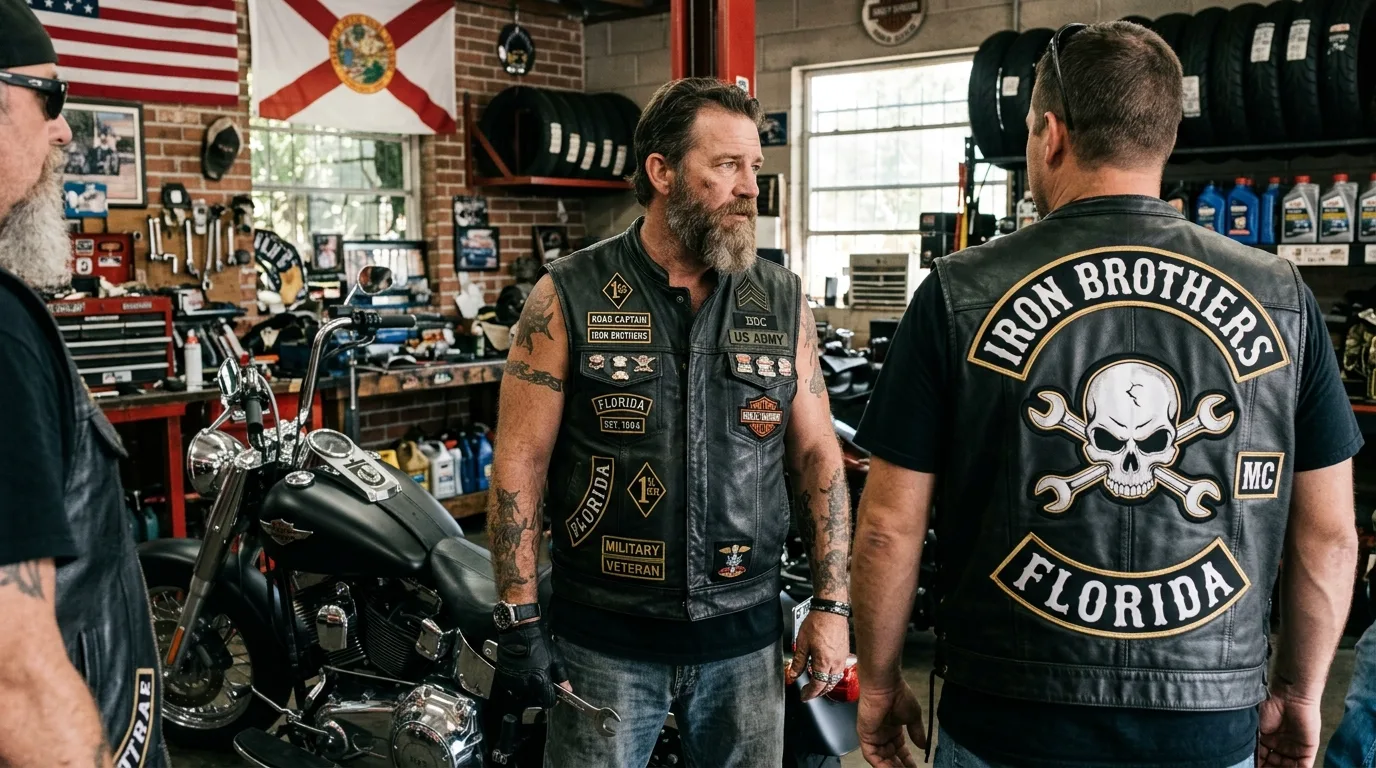
Three-piece sets. Top rocker, center patch, bottom rocker. This is the standard for chartered motorcycle clubs. The top carries the club name. The center carries the logo. The bottom carries territory or chapter.
Two-piece sets. Top rocker and center. No territory claim. Often used by riding clubs or clubs still working toward charter status.
One-piece patches. A single emblem, no rockers. This is what most independent riders wear, and it's the safest choice if you're not patched into a club.
Front patches. Club name on the left chest. Personal or memorial patches on the right. Rank patches below the club name on the left side.
Small stuff. Name tags, event pins, and achievement patches go on the lower front panels or the sides. Never on the back rockers.
Motorcycle Vest Patch Placement Rules to Follow
Measure From the Shoulder Seam
Top rocker sits three to four inches below the collar seam. Measure from the seam, not from the collar edge. Those two numbers are different, and using the wrong one throws the whole stack off.
Center on the Spine, Not the Vest
Lay the vest flat and find the actual center line. If you center on the vest edges, the patch drifts once the vest is worn and the leather pulls. Pin the top rocker first. Everything else lines up under it.
Keep the Gaps Even
The gap between the top rocker and the center patch should match the gap between the center and the bottom rocker. Uneven gaps are the number one visual mistake I see on finished vests.
Don't Crowd the Bottom Rocker
Leave two to three inches between the bottom rocker and the hem. Crowding it looks cramped and the patch curls.
How to Choose What Goes Where
Start with your status. If you're in a chartered club, the layout is set. You don't choose. You follow what the club uses.
If you're independent, you have freedom, and you should use it carefully. A three-piece layout on an independent rider looks like a claim. That causes problems. Stick to a single back patch, or keep patches on the front panels only.
Then think about weight. A full leather center patch is heavy. On a thin vest, heavy patches pull the fabric and sag over time. If your vest is lightweight, go with a woven or embroidered center patch instead of leather.
Backing is the next call. Sew-on lasts longest, and it's what I recommend for anything that stays on the vest permanently. Iron-on fails on leather. The heat damages the surface and the adhesive lets go within months. I've watched iron-on patches lift off leather vests before the first summer ended. Don't do it.
Velcro is fine if you plan to swap patches. It adds a layer and it can look bulky on the front, but it works.
How Ordering Actually Works
You send artwork. Logo file, sketch, photo of an old patch. A designer builds a digital proof and sends it back.
Here's the mistake I see most. People set text too small for the rocker curve. A font that looks fine on a flat mockup turns into mush once it's curved across the shoulders. If your club name is long, make the rocker wider instead of shrinking the letters. Under a quarter inch tall and it stops reading from a few feet away.
You approve the proof. Production starts. Lead time runs ten to fourteen business days for most orders. If you have a rally or a memorial ride coming, say so on day one. I've seen a club approve proofs two days before an event and then wonder why the box didn't arrive. The clock starts after approval, not after your first email.
What Drives the Price
Four things. Size, thread count, material, and quantity.
Back patches are the big spend because they're large. A ten-inch top rocker uses far more thread than a four-inch chest patch.
Thread count matters if you have heavy fills of color. Dense stitching takes longer.
Material is a real jump. Leather costs more than embroidered, and embroidered costs more than woven. Leather also weighs more, which matters on thin vests.
Quantity is the last lever. Setup work doesn't shrink. Digitizing, machine setup, proofing. Same work whether you order one patch or one hundred.
Bulk Discounts and When They're Worth It
Bulk pricing drops in steps. Small runs cost the most per piece. Somewhere around a hundred units, the price takes a real dip.
If your whole club is ordering, put one order together instead of ten separate ones. You'll get the bulk rate and your patches will match. Same colors, same size, same border. That matters when members stand side by side.
But here's a firm position. If you're one independent rider ordering a single back patch, don't chase bulk pricing you'll never use. Buy one good patch. Spend the money on quality thread instead of quantity.
Shipping and Turnaround
Standard production runs ten to fourteen business days after approval. Rush options exist and shave off roughly a week.
US shipping is quick, usually a few days. Free shipping is common on larger orders. Ask for the cutoff date in writing. Phone promises don't help when a rally is coming.
Order a spare. Riders lose vests. Leather gets damaged. A second patch from the same run matches perfectly. Ordering one later almost never does.
Top 5 Benefits of Getting Placement Right
It Looks Intentional
A straight, evenly spaced layout reads as professional. A crooked one reads as a rush job, and everyone notices.
It Respects Tradition
Club layout rules exist for a reason. Following them keeps you out of trouble and shows respect for the culture.
It Balances the Vest
Proper spacing distributes weight across the back. The vest hangs better and lasts longer.
It Ages Well
Patches placed with room to spare don't curl at the edges. Crowded patches do, especially on leather.
It Saves Money
Getting it right the first time means you don't pay to remove and re-stitch a bad layout.
Testimonials
"Followed the spacing advice and my three-piece set sits perfectly. First try." — Rick D., Daytona Beach, FL
"We ordered front patches for our riding group and the proofs came back fast. Fit every vest without adjustment." — Monica L., Phoenix, AZ
"Had a bad layout on my old vest. Ordered a fresh patch and did it right this time. Big difference." — Trevor K., Boise, ID
Frequently Asked Questions
What is the proper placement for a top rocker?
Three to four inches below the collar seam, centered on the spine, curving with the shoulder line.
How do I measure for motorcycle vest patch placement?
Lay the vest flat, find the true center, and pin the top rocker first. Everything stacks under it.
Why do my patches curl at the edges?
Usually crowding. Leave two to three inches between the bottom rocker and the hem.
What backing should I use on leather?
Sew-on. Iron-on heat damages leather and the adhesive fails within months.
How long does production take?
About ten to fourteen business days after you approve the proof. Rush options exist.
Can I move a patch after it's stitched?
Removing stitches leaves holes in leather. Plan the layout before anyone touches a needle.
Order Your Patches With the Layout Sorted
Pin your top rocker, check the gaps, and lock the size before you send the file. Once you're ready, Order Now from All Embroidered. Premium patches, fair pricing on bulk orders, and fast US shipping.
All Embroidered has been a trusted custom manufacturing company since 2007, delivering premium custom patches, keychains, scout neckerchiefs, and stickers for businesses, clubs, and organizations worldwide. We combine expert craftsmanship, high-quality materials, competitive pricing, and dependable customer service to ensure every order exceeds expectations. Contact us today to bring your custom designs to life with fast production and worldwide shipping. Phone: +1 (407) 690-8902. Email: [email protected]. Website: https://allembroidered.com. U.S. Mailing Address: 3564 Avalon Park E Blvd, Ste 1-A802, Orlando, FL 32828, USA.