A glass splashback is one of those choices that feels “small” until it’s installed, lit up, and sitting behind every meal you cook.
Get it right, and the kitchen looks calmer and easier to keep clean; get it slightly wrong, and you’ll notice it every time the kettle steams up the corner or the under-cabinet LEDs pick out a wavy silicone line.
Most regrets aren’t about glass itself—they come from timing, measurements, and the few details people assume will “sort themselves out”.
What glass is actually solving (and what it can’t)
A splashback has two jobs: protect the wall from moisture/grease, and visually connect the bench, cabinets, and appliances into one coherent run. Glass does that with fewer grout lines and a simpler wipe-down, which is why it’s popular in modern kitchens and tidy renovations.
But glass won’t magically fix a crooked wall, a benchtop that isn’t perfectly level, or power points that move after you’ve signed off on the cut-outs. It’s a finishing layer, and finishing layers are brutally honest.
If you go in expecting it to hide rough edges, you’ll end up paying for extra sealant, extra joins, or a design compromise you didn’t plan for.
The decisions that matter more than people think
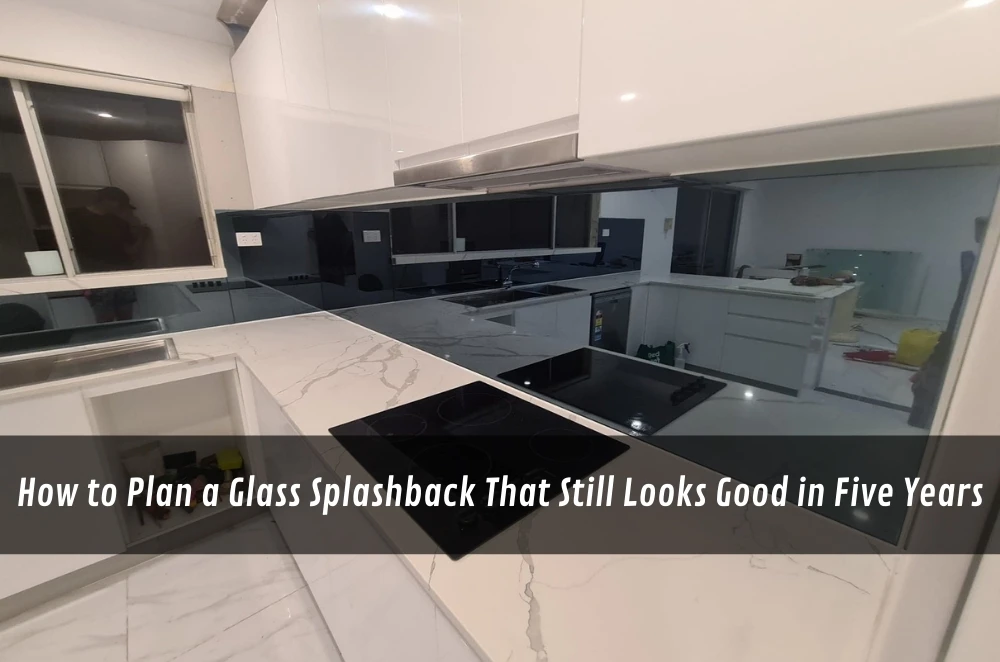
Finish: reflective, soft, or somewhere in between
High-gloss looks sharp and makes spaces feel bigger, but it also highlights fingerprints, splash marks, and hotspots from lighting. A softer finish can reduce glare and hide day-to-day smears, though it can slightly mute colour and reflections.
Think about how the kitchen is used at night, not just at noon. A reflective surface under bright warm LEDs can look like a mirror in photos, then feel “busy” during dinner when it’s catching everything.
Colour: it’s not just “white” or “grey”
Glass colour is usually judged in context, and context changes fast: a warm stone benchtop can make a cool white look clinical, while a cool benchtop can make a warm white look yellow. If you’re colour matching to cabinetry, check it next to the door finish, not next to a paint swatch on your phone.
Also consider what you’re trying to hide. A deep charcoal can be dramatic, but it may show wipe marks behind a cooktop more than you expect if you’re cooking often.
Panel layout: where joins land, not whether they exist
A near-invisible join in a low-visual area can be better than a risky “single-piece” plan that becomes hard to transport, manoeuvre, or install cleanly. Big panels look seamless, but they demand more from access, handling, and wall straightness.
If your kitchen has returns, window reveals, or a tight corner, the join placement can make the difference between “intentional detail” and “why does that line land right there?”
Measurements and layout: the bit that prevents last-minute chaos
Most splashback stress starts with the same misunderstanding: people treat measurement like it’s just height and width. In reality, it’s about interfaces—every place the glass meets something else.
Power points, switches, and cut-outs
Cut-outs are unforgiving. A plate that shifts 10–15 mm after measurement can turn into a visible gap, a plate that doesn’t sit flat, or a rework delay when you least want it.
Lock in the exact type of plates (standard, slimline, USB combos), the positions, and whether anything is sitting under cabinetry (think: appliance garage outlets, lighting transformers, or a hidden switch). Then do a quick on-site “eyes on” check after cabinetry and benchtops are installed, because drawings don’t always match what ends up on the wall.
This is also where people forget about future use. If the toaster, coffee machine, or mixer lives in one corner, the outlet placement can become the daily annoyance you didn’t budget for.
Corners, window reveals, and uneven walls
Corners and window returns are where good planning looks like craftsmanship. Decide early whether the glass is wrapping into the reveal, stopping short with a neat termination, or finishing into a side panel.
Older homes (and plenty of apartments) can have walls that bow slightly. If you try to force a perfect rectangle into an imperfect space, you’ll either see gaps or you’ll see an oversized silicone bead trying to hide them.
Renovation sequencing: when measurement should happen
In most kitchen setups, the most reliable sequence is: cabinetry → benchtop → final measure → fabrication → install. Measuring off plans or pre-benchtop lines is where the “mysterious 6 mm” shows up later—usually right where your eye naturally tracks along the bench.
If you want a simple reference point to line up your cut-outs, returns, and finish choices before you commit, the Intrinsic Glass splashback options guide is a handy mid-planning checklist.
Common mistakes that blow budgets or timelines
People choose a splashback colour early because it’s fun, then realise later the lighting temperature has changed, or the cabinetry finish is slightly different in real life. That’s how you end up with a “white” that feels off by a mile even though it looked fine on a screen.
Another classic is assuming the wall is square, then discovering the benchtop sits a touch proud at one end, and the gap line becomes the feature. It’s not a disaster, but it often forces more sealant, more fiddly edge finishing, or a join line that wasn’t in the original plan.
The most expensive mistake is moving outlets late. Even if the change is small, it can cascade into re-measuring, re-ordering, and re-booking trades.
And then there’s the silicone issue: thick, uneven beads aren’t just aesthetic, they collect grime and can discolour over time. If you’re relying on silicone to “fix” poor alignment, it will eventually look like a fix.
Choosing an approach or provider: what to weigh up
How they handle tolerances (because real walls are real)
Ask how the final measurement is taken and what the process looks like when the space isn’t perfect. You’re not looking for a promise that everything will be flawless; you’re looking for a method that anticipates the normal quirks of homes.
Who owns the cut-out sign-off
The safest workflow is one where someone is responsible for verifying outlet positions in the finished kitchen, and there’s a clear sign-off moment before fabrication. “We thought the electrician was done” is a painful sentence when the glass is already made.
Lead times and trade coordination
A splashback is a late-stage item. If it’s delayed, it can hold up final fit-off, painting touch-ups, or the moment you can actually use the kitchen properly. Make sure your schedule includes the measurement and installation of windows that work with the electrician and any final cabinet hardware changes.
Maintenance reality
Some looks require more wiping. That’s fine—plenty of people happily trade a little maintenance for a sharp finish—but it should be a conscious choice, not a surprise in week three.
Operator experience moment
In practice, the smoothest installs happen when someone treats the splashback as part of the “services and finishes” conversation, not a decorative add-on at the end. The moment you align outlet plates, lighting, and final benchtop lines, the rest gets calmer—fewer frantic calls, fewer “can we just move this?” requests. The custom glass splashbacks for kitchens that feel effortless later are usually the ones that were a bit more boring up front, with a couple of careful checks at exactly the right time.
A simple 7–14 day plan that doesn’t overcomplicate it
Days 1–2: Decide what you’re optimising for.
Is it low maintenance, a seamless look, maximum light bounce, or a specific colour match?
Days 3–5: Freeze the layout of anything that punches through the glass.
Power points, switches, tapware zones, rangehood details, and any under-cabinet lighting components.
Days 6–8: Confirm sequencing with whoever is coordinating the job.
You want cabinetry and benchtops in before final measurement, and you want clarity on who signs off on cut-outs.
Days 9–11: Check colour/finish in the actual space.
Do it under your real lighting (or as close as possible), next to the cabinetry and benchtop surfaces.
Days 12–14: Prepare for measurement and install day.
Clear access, confirm plates are the correct type, and do one last “walk the wall” check for anything that’s changed.
Local SMB mini-walkthrough (Sydney/NSW scenario)
A small café in Inner West Sydney refreshes its behind-the-counter service area.
The owner wants a wipe-clean surface that doesn’t trap grime as grout can.
They keep most existing outlets but add one for a grinder and another for a small under-bench appliance.
After the benchtop goes in, a corner wall is slightly out, so the edge detail is planned to finish neatly rather than forcing a perfect rectangle.
The finish is chosen with overhead lighting in mind, so it doesn’t look streaky during the early-morning rush.
Installation is booked after the electrical fit-off, so cut-outs match the final plates.
Practical Opinions
Glossy can look stunning, but only choose it if you’re okay with wiping it more often in the high-splatter zones.
If the outlet positions aren’t locked, don’t treat the splashback as “ready” yet.
A tidy termination detail beats a thick silicone border every time.
Key Takeaways
- Plan the interfaces early: outlets, corners, window reveals, and returns.
- Measure after cabinetry and benchtops are installed, not off drawings.
- Choose colour and finish under the lighting that the kitchen will actually use.
- Make cut-out sign-off a formal checkpoint before fabrication.
Common questions we hear from businesses in Sydney, NSW, Australia
Q1) When should the splashback be measured—before or after the benchtop?
Usually, it’s measured after cabinetry and benchtops are installed, because that’s when the true lines and levels are set. Next step: confirm the intended measurement point (benchtop line, cabinet underside, or both) with whoever is coordinating the install. In Sydney fit-outs, small site variations are common, especially in older buildings or tight tenancies.
Q2) Is one big panel always better than multiple panels?
It depends on access, handling, and whether a join line can be placed somewhere visually quiet. Next step: map your wall run and identify corners, returns, and obstacles, then ask where the joins would land in the real space. In many Sydney locations, stairs, lifts, and parking/loading constraints influence what’s practical.
Q3) How do we reduce visible smears and streaks day to day?
In most cases, finish choice and lighting are the biggest factors, not the fact that it’s glass. Next step: test your preferred finish under the same lighting temperature you’ll use (warm vs cool LEDs) and in the same viewing angle as the work zone. In NSW cafés and commercial kitchens, high-use zones behind prep areas will show marks faster than decorative sections.
Q4) What’s the most common coordination failure you see?
Usually, it’s the power point positions changing after measurement, or plates being swapped to a different style late in the job. Next step: do a final on-site check of outlet locations and plate types immediately before sign-off for fabrication. In Sydney, last-minute trade scheduling shifts can happen, so that “five-minute check” is often what prevents a week of delays.