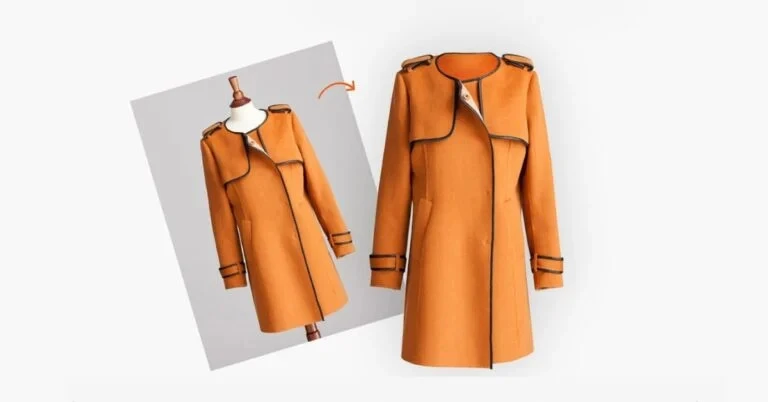
The ghost mannequin service Effect, also known as the invisible mannequin or hollow man effect, is a powerful photography technique widely used in fashion e-commerce. It creates the illusion that a garment is being worn by an invisible model, allowing customers to see the shape, fit, and interior details of the clothing without distraction.
Major retailers and marketplaces such as Amazon, Shopify, and eBay rely heavily on this method to maintain a clean, professional look in their product listings.
In this comprehensive guide, we’ll walk through the step-by-step process of creating the Ghost Mannequin Effect, from planning and shooting to post-production and final export.
What Is the Ghost Mannequin Effect?
The ghost mannequin service Effect is a post-production photography technique that removes the mannequin from product images while preserving the garment’s natural shape. The result looks as if the clothing is floating in mid-air, yet still retains realistic depth and dimension.
This effect is especially popular for:
· T-shirts and tops
· Jackets and coats
· Dresses
· Sweaters
· Formal wear
Now, let’s dive into the step-by-step process.
Step 1: Gather the Right Equipment
Before you begin, ensure you have the following tools:
Camera and Lens
A DSLR or mirrorless camera with a mid-range lens (50mm to 85mm) works best to avoid distortion and maintain accurate proportions.
Mannequin
Use a detachable or removable mannequin. Adjustable mannequins with removable necks and arms make editing much easier.
Lighting Setup
Consistent studio lighting is critical. Use:
Two softboxes at 45-degree angles
A fill light or reflector
A white background
Even lighting ensures easier editing and less shadow correction later.
Step 2: Prepare the Garment
Preparation is key to achieving a professional look.
Steam or Iron the Clothing
Wrinkles are extremely noticeable in high-resolution product images. Always steam or iron the garment before placing it on the mannequin.
Fit the Garment Properly
Make sure the clothing:
Fits snugly on the mannequin
Has no bulges or excess fabric
Is aligned symmetrically
Use pins or clips at the back if necessary, but keep them hidden from the camera view.
Step 3: Position the Mannequin and Adjust Lighting
Place the mannequin in the center of your white backdrop. Adjust your lighting so that:
There are no harsh shadows
The garment color is accurate
The exposure is balanced
Take a few test shots and check your camera settings:
ISO: 100–200
Aperture: f/8 to f/11
Shutter Speed: Adjust for proper exposure
Consistency in settings is crucial if you're shooting multiple products.
Step 4: Capture the Main Product Image
Take the primary front-facing shot of the garment on the mannequin. Ensure:
The garment is centered
The camera is level with the chest area
There is no distortion
This will serve as your base image.
You may also take additional angles (side and back views), but for the ghost mannequin service effect, the front shot is typically the most important.
Step 5: Photograph the Inside (Neck/Back Area)
This step is what creates the “ghost” illusion.
Remove the garment from the mannequin and turn it inside out, or reposition it to photograph the inner neckline and back area. This provides the fabric detail that will later fill the hollow space left after removing the mannequin.
Be sure to:
Use the same lighting
Keep the camera position consistent
Match exposure settings exactly
This image will be layered into the main photo during editing.
Step 6: Import Images into Editing Software
Open your images in a professional editing program such as Adobe Photoshop.
Import both:
The main mannequin image
The inner neckline/back image
Place them in the same document as separate layers.
Step 7: Remove the Mannequin
This is where the transformation begins.
Use Selection Tools
Use tools such as:
Pen Tool
Quick Selection Tool
Lasso Tool
Carefully trace around the garment edges to separate it from the background.
Create a Mask
Add a layer mask and remove the mannequin area inside the clothing (neck, sleeves, etc.).
Zoom in closely to refine edges and avoid jagged lines.
Step 8: Insert the Inner Neck/Back Section
Now, bring in the second image (inside shot).
Cut out the neckline or inner area
Drag it beneath the main garment layer
Align it precisely
Use transform tools (Ctrl+T or Cmd+T) to resize and adjust perspective if necessary.
Blend the layers carefully so that the inner section looks naturally attached.
Step 9: Refine Edges and Shadows
To achieve a realistic floating look:
Smooth Edges
Refine with:
· Feathering (0.5–1 px)
· Edge smoothing tools
· Add Natural Shadow
If needed, create a subtle inner shadow where the fabric folds inward.
Avoid heavy shadows—subtlety creates realism.
Step 10: Retouch and Color Correct
Professional e-commerce images require precise finishing.
· Remove Imperfections
· Dust spots
· Loose threads
· Minor wrinkles
· Adjust Color Balance
Ensure the garment color matches the real product.
You may adjust:
· Brightness and contrast
· Levels
· White balance
Consistency across all product images builds brand trust.
Step 11: Replace or Clean the Background
If your background isn’t perfectly white, remove it and replace it with a pure white (#FFFFFF) layer.
Many online marketplaces require pure white backgrounds for compliance. Platforms like Amazon specifically recommend clean, distraction-free product imagery.
Step 12: Final Review and Export
Before exporting:
Zoom to 100% to check edges
Compare before-and-after
Ensure no visible mannequin traces remain
Export settings typically include:
JPEG format
sRGB color profile
High resolution (2000px+ on longest side)
Optimize file size without losing clarity.
· Pro Tips for Better Ghost Mannequin Service Results
· Use a neck-joint mannequin for easier removal
· Keep the camera tripod-locked to maintain alignment
· Batch edit similar items for efficiency
· Maintain consistent lighting for brand uniformity
Why the Ghost Mannequin Effect Matters
In online retail, customers can’t try on clothing. The ghost mannequin service effect:
· Shows garment structure clearly
· Highlights fit and stitching
· Creates a premium brand feel
· Increases buyer confidence
· Reduces return rates
Compared to flat lay photography, this technique adds depth and realism without the cost of live models.
Conclusion
Creating the ghost mannequin service Effect is both a technical and creative process. It requires careful garment preparation, controlled studio lighting, precise photography, and skilled post-production editing. While it may seem complex at first, mastering this method dramatically elevates the quality of fashion product images.
By following this step-by-step approach, shooting correctly, capturing inner details, removing the mannequin cleanly, and refining the final image, you can achieve professional, marketplace-ready visuals that compete with top e-commerce brands.