Setting up a home theater is an exciting project for any movie enthusiast or tech lover. With projectors becoming more affordable and feature-rich, creating a cinematic experience at home has never been easier. However, the installation process requires careful planning and precision to get the best picture and sound quality. XTEN-AV, a leader in modern AV design automation, offers tools that make the entire process smoother, ensuring a professional-grade setup. Whether you are building from scratch or upgrading your entertainment area, this detailed guide will walk you through every stage of a proper Home Theater Projector Setup.
1. Choose the Right Projector
The first step in your home theater installation is selecting a projector that matches your room’s dimensions, lighting conditions, and desired picture quality. Consider these key factors:
- Resolution: For a true cinematic experience, go for Full HD (1080p) or 4K projectors.
- Brightness: Rooms with more ambient light require higher lumens (2500 or more), while darker rooms can work with lower brightness levels.
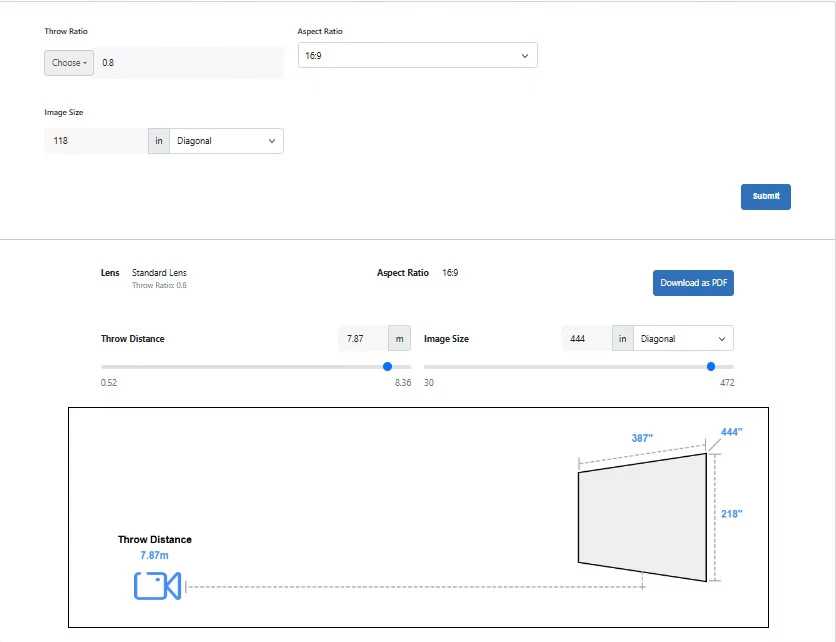
- Throw Ratio: This determines how far the projector must be from the screen to produce the desired image size. Short-throw or ultra-short-throw projectors are best for small rooms.
- Connectivity: Ensure your projector supports HDMI, USB, and wireless connections for easy device integration.
A careful selection ensures your system meets your viewing expectations without the need for constant adjustment.
2. Pick the Ideal Screen
Your screen choice directly impacts image clarity and color accuracy. There are three main options:
- Fixed Frame Screens: Great for dedicated home theaters where the screen will remain in one position.
- Motorized Screens: Perfect for multi-use spaces where you want the screen to retract when not in use.
- Painted Walls: A budget-friendly option, though it may not offer the same contrast or brightness as a proper screen.
Choose a screen size that fits your wall space and maintains a comfortable viewing distance for all seats in the room.
3. Determine the Projector Placement
Projector placement is crucial to achieving a properly aligned and distortion-free image. Begin by checking your projector’s throw ratio and calculating the ideal distance from the screen. This is where XTEN-AV’s AV design tools come in handy—they help visualize accurate positioning, saving you time and reducing Projector Placement Mistakes.
You can install your projector in one of the following ways:
- Ceiling Mount: Offers a clean, professional look and saves space. Ideal for permanent setups.
- Tabletop Mount: Easier to install but requires a stable surface and proper height alignment.
Use the projector’s zoom and focus controls to fine-tune the image once mounted.
4. Install the Mount or Stand
If you’re going for a ceiling mount, ensure it’s secured to a stud or joist for maximum stability. Use a mount compatible with your projector model and follow these steps:
- Mark the mounting position based on your screen alignment.
- Drill holes and fix the mount using anchor bolts.
- Attach the projector securely, ensuring it’s level.
- Adjust tilt and rotation to match the center of the screen.
For tabletop setups, use adjustable stands to achieve the correct height and angle without obstructing the viewing area.
5. Manage the Cables
Cable management is often overlooked but plays a huge role in maintaining a clean setup. HDMI, power, and audio cables should be neatly routed to prevent tangling and signal loss. Use cable organizers, wall channels, or in-wall wiring solutions for a polished look.
If your projector supports wireless streaming, you can reduce cable clutter even more by connecting via Wi-Fi or Bluetooth to your media devices.
6. Connect the Audio System
A home theater is incomplete without great sound. Connect your projector to a soundbar, AV receiver, or surround sound system. HDMI ARC or optical connections deliver the best audio quality with minimal latency.
If you are using XTEN-AV’s design tools, you can plan your audio configuration and speaker layout with precision, ensuring immersive sound coverage throughout the room.
7. Adjust Picture Settings
Once everything is connected, it’s time to calibrate your projector for the best viewing experience. Adjust the following settings:
- Focus: Ensure sharpness and clarity at the center and edges of the screen.
- Keystone Correction: Fix any trapezoidal distortion caused by off-angle projection.
- Brightness and Contrast: Calibrate according to room lighting for balanced image quality.
- Color Temperature: Choose a setting that provides natural skin tones and vibrant visuals.
Some modern projectors even come with auto-calibration features, making this step easier for beginners.
8. Test and Fine-Tune
After setup, play a high-quality video or movie to test your installation. Observe the picture alignment, sharpness, and sound synchronization. Make minor adjustments to placement, zoom, or sound settings as needed.
This stage is about fine-tuning rather than major repositioning. Patience pays off here—a few minutes of calibration can greatly enhance your overall experience.
9. Maintain and Clean Regularly
To ensure long-lasting performance, clean your projector lens and air filters regularly. Dust buildup can affect image clarity and cause overheating. Use a soft microfiber cloth for the lens and compressed air for vents.
Also, keep your projector firmware updated to benefit from the latest performance improvements and compatibility fixes.
10. Use XTEN-AV for Professional Planning
Planning a Home Theater Projector Setup involves many details—from room measurements to wiring and speaker layout. XTEN-AV offers an intelligent AV design platform that simplifies these tasks. It helps you visualize your layout, calculate throw ratios accurately, and avoid Projector Placement Mistakes before installation even begins. With XTEN-AV, your home theater setup process becomes faster, more precise, and future-ready.
Conclusion
Installing a home theater projector may seem complex at first, but following a structured, step-by-step approach ensures a seamless setup. The right tools, careful planning, and proper alignment all contribute to a truly immersive cinematic experience. Whether you’re a DIY enthusiast or a first-time installer, using advanced solutions like XTEN-AV can help you design, plan, and execute your setup like a professional.
Transform your room into your personal cinema today. With the right guidance and precision tools, your home theater projector installation will deliver years of unforgettable movie nights.