Sometimes, QuickBooks users experience difficulties when attempting to convert their files to PDFs or print them. A common error message that may appear is:
“QuickBooks detected that a component required to create PDF is missing.“
This error message can cause concern among users as it doesn’t specify which component is missing, making it difficult to identify the root cause of the error. Our detailed guide will help you understand the reasons, consequences, and troubleshooting solutions to resolve the QuickBooks missing PDF component error.
Solutions to Fix QuickBooks Detected that a Component Required to Create PDF
Let’s explore how to fix the QuickBooks PDF component missing issue with effective troubleshooting steps:
Solution 1: Update QuickBooks Desktop to the Latest Release
Updating your QuickBooks software to the latest release can often resolve PDF-related issues. Follow these steps:
- Visit the QuickBooks Download and Update web page
- Select your QuickBooks product from the drop-down list
- Provide necessary details like Version, Country, Product, etc.
- Click on Search
- Click on “Get Latest Updates” and save the file
- Install the downloaded file to complete the update
Note: Select the best download location on your particular computer and then you install the downloaded file in order to complete the task. In case QuickBooks fails to complete the present action because of a missing component error message displays on the window again, shift to the next location.
Read More: QuickBooks Error PS038
Solution 2: Update and Repair Adobe Acrobat Reader
A damaged or outdated Adobe Acrobat Reader can lead to PDF issues in QuickBooks. Here’s how to address this:
Step 1: Look for Updates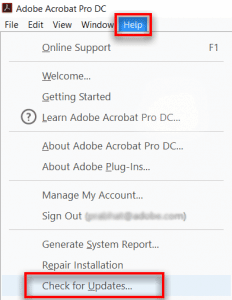
- Click the Windows Start icon and type “Adobe” in the search box
- Open Adobe Reader
- Go to the Help tab and select “Check for Updates”
- Follow the instructions to install any available updates
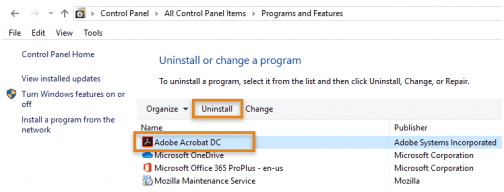
- Close all running applications on your computer
- Press Windows + R to open the Run window
- Type “appwiz.cpl” and press Enter
- Select Adobe Reader and choose “Uninstall/Change”
- Click Next, then Install
- Click Finish to complete the process
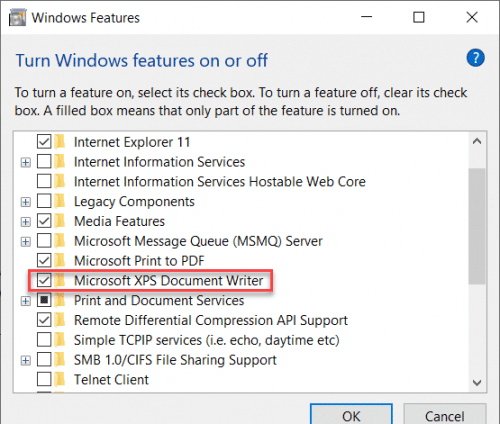
Solution 3: Activate and Enable Microsoft XPS Document Writer
Activating the Microsoft XPS document writer can help resolve the QuickBooks Missing PDF Component error:
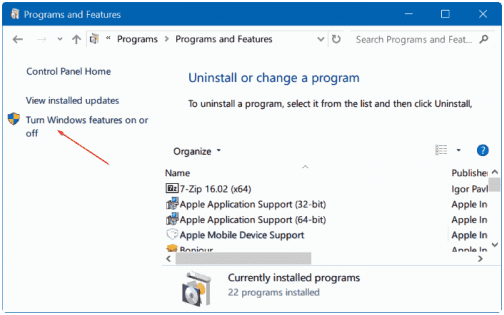
- Press Windows + R to open the Run command
- Type “appwiz.cpl” and press Enter
- In the Programs and Features window, click “Turn Windows features on or off”
- Check the box next to “Microsoft XPS Document Writer” to enable it
Solution 4: Use QuickBooks Print & PDF Repair Tool
The QuickBooks Print & PDF Repair Tool is designed to resolve various Print & PDF related errors:
- Download and install QuickBooks Tool Hub from the official website
- Open QuickBooks Tool Hub
- Go to the “Program Problems” tab
- Select “QuickBooks PDF & Print Repair Tool” and let it run
- Try to save or print a PDF after the repair process completes
Solution 5: Reset Permissions for Your TEMP Folder
Resetting permissions for the TEMP folder can help resolve PDF-related issues:
- Press Windows + R and type “%TEMP%”
- Right-click in the Temp folder and select Properties
- Go to the Security tab
- Ensure all user names and groups have Full Control
Solution 6: Set the PDF Viewer as the Default Program
Setting a default PDF viewer can resolve the QuickBooks PDF Missing Component issue:
- Open Windows Settings
- Go to Apps > Default Apps
- Scroll to find .pdf and choose its default program
- Select QuickBooks PDF Viewer or another installed PDF viewer
- Click “Switch Anyway” to complete the process
Solution 7: Test, Adjust, and Reinstall XPS Document Writer
This solution involves testing the XPS Document Writer and reinstalling it if necessary. The steps may vary depending on your Windows version.
Step 1: Run a Test on the XPS Document Writer and Print Outside the QB AppFollow these steps to fix QuickBooks 2018’s “Missing Manual PDF” issue:
- Choose Print from the File menu by going there.
- In the print box, choose the Microsoft XPS Document Writer from the printer list. Pick Print from the menu.
- On your computer’s desktop, save the file with the .XPS extension in a location that is simple to find.
- Go to this desktop now, and look for the .XPS file:
- If an error occurs when you access the .XPS file or it doesn’t open properly when you try to open it, you should reinstall the Microsoft XPS Document Writer.
- If you are unable to see any files and no errors are displayed when saving, the security settings may be the cause of your problem. It can make printing difficult. Also, it is possible that after you created the .XPS file, it was erased. See whether using the QuickBooks Component Repair Tool can solve this problem.
- You will be requested to reinstall the printer if there is an issue with printing or if the XPS Document writer is not visible.
If you need to reinstall the Microsoft XPS Document Writer, follow these processes. Depending on the Windows version 11 you are using, the steps may change.
For Windows 8:
- You have to Start the menu.
- Go to the settings for your system and then you have to select the Control panel from here.
- Tap the Devices and Printers option once again.
- Select the Microsoft XPS Document Writer icon at this point. Then select Remove device from the menu.
- Tap Yes to accept the change.
- From the toolbar, you have to select Add a printer.
- After that, select Add a local printer or Network Print with Manual Preferences.
- In the Use an existing port box, select PORTPROMPT: (Local port), then click Next.
- Select Microsoft under “Manufacturers” by tapping it. Select Microsoft XPS Document Writer v4 after that. Finally, click Next.
- Select Replace Current Driver from the menu. To succeed you have to select Next.
- In the printer name field, remove v4 from the name of the Microsoft XPS Document Writer.
- Then you have to unmark the box to make XPS your default printer by clicking Finish.
For Windows 7/ Vista:
- Begin by going to the Windows start menu to look for Devices and Printers.
- Pick Microsoft XPS Document Writer from the list. Select Remove Device from the menu.
- Verify your choice by selecting Yes.
- Then you have to select Add a local printer from the toolbar to add a printer.
- Then you have to select the option that states Use an existing port.
- Next, select XPS Port: (Local Port).
- From the manufacturer’s list, select Microsoft. Select Microsoft XPS Document Writer v4 at this point. At last, you have to click Next.
- You have to select the option. Click Next to replace the existing driver and complete the process.
Solution 8: Edit the Security Software Settings
Security software like Norton Antivirus or McAfee Firewall may prevent the creation of .XPS files. Check these settings and consider consulting your system administrator or the security software provider for assistance.
Conclusion
We’ve guided you through all possible routes to fix the QuickBooks missing PDF component errors. Follow each troubleshooting step in the given order. If fixing such errors on your own proves challenging, consider seeking professional help.
For all kinds of professional assistance related to the QuickBooks missing PDF component error, you can connect with QuickBooks Data Service experts via LIVE CHAT.
Read More: QuickBooks won’t open