For many golf lovers, the idea of stepping out the back door to practice a few putts is the ultimate luxury. A backyard putting green isn’t just for professionals or country clubs anymore—homeowners everywhere are discovering that creating a personal short-game oasis is more achievable than ever. With thoughtful planning and the right approach, you can transform an unused corner of your yard into a space that improves your game and adds character to your home.
Start With a Clear Vision
Every successful project begins with imagination. Picture how you want to use the green. Is it strictly for serious practice, or do you want a fun feature where friends can gather? Think about size, shape, and difficulty level. Some people prefer a simple two-hole layout for quick daily drills, while others dream of multiple tiers, fringe areas, and even a small bunker. Sketch a few ideas on paper and walk around your yard to see what feels natural within the landscape.
Evaluate Your Space
Not every backyard is perfectly suited for a putting surface, but most can be adapted. Look for an area that receives a good amount of sunlight and has decent drainage. Low spots that collect water will require extra preparation, while heavily shaded areas may limit grass growth if you plan on using real turf. Measure the space carefully and note obstacles such as tree roots, sprinkler lines, or utility boxes. Understanding these limitations early will save time and frustration later.
Choose Between Real Grass and Synthetic Turf
One of the biggest decisions is whether to install natural grass or artificial turf. Real grass offers the authentic look and feel of a course green, but it demands consistent mowing, fertilizing, watering, and pest control. Bentgrass and Bermuda are popular choices, yet they require specific climates and professional maintenance to stay smooth.
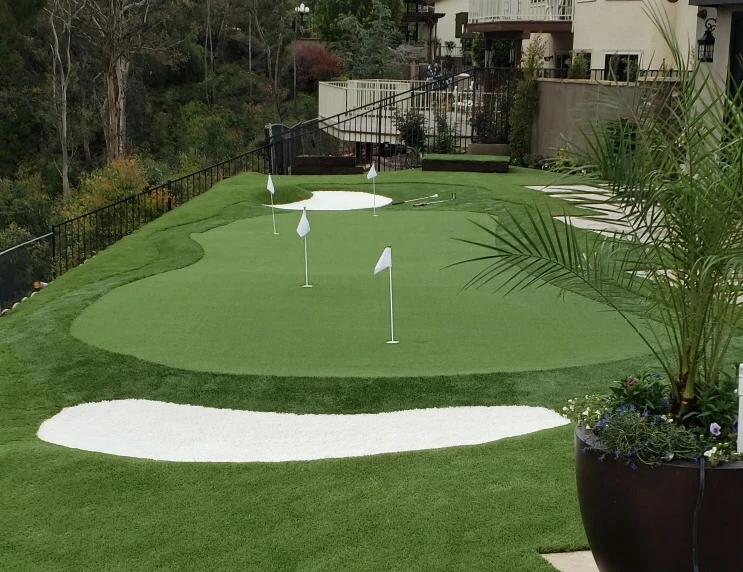
Synthetic turf, on the other hand, has become remarkably realistic. Modern products mimic the speed and roll of tournament greens while needing very little upkeep beyond occasional brushing and rinsing. Although the initial cost can be higher, many homeowners appreciate the long-term savings and the ability to practice year-round without worrying about weather or brown patches.
Set a Realistic Budget
Costs vary widely depending on size and materials. A modest DIY synthetic green might run a few thousand dollars, while a professionally designed natural green with irrigation and lighting can reach well into five figures. Create a budget that includes site preparation, base materials, cups and flags, and any extras like fringe grass or chipping mats. Leaving a cushion for unexpected expenses is wise; soil conditions and drainage work often add surprises.
Prepare the Foundation
The secret to a smooth, true-rolling surface lies beneath what you see. Whether you choose real or synthetic turf, the ground must be properly graded and compacted. Remove existing sod and debris, then shape the area to include subtle breaks and slopes that challenge your putting skills. Most installations use layers of crushed stone or gravel followed by fine screenings to create a firm base. Taking time at this stage ensures the finished green won’t develop bumps or depressions later.
Add Features That Match Your Goals
A simple flat rectangle may be easy, but a few creative touches can make practice far more engaging. Consider multiple cup locations so you can change targets regularly. Gentle undulations help you learn to read break, while a fringe collar allows for chipping and pitching practice. If space permits, a small bunker or rough area can turn the green into a complete short-game station. Think like a course designer and build challenges that mirror the shots you face on your favorite holes.
Decide: DIY or Professional Help
Many homeowners enjoy tackling the project themselves, especially with synthetic turf kits that include detailed instructions. If you’re comfortable with landscaping tools and have patience for precise leveling, a DIY approach can be rewarding and cost-effective. However, for natural grass greens or complex designs, hiring an experienced installer is often the better route. Professionals bring specialized equipment and knowledge about drainage, soil composition, and green speeds that are hard to replicate on your own.
Plan for Maintenance
Even low-maintenance greens need some care. Synthetic surfaces should be brushed periodically to keep fibers standing upright and to maintain consistent roll. Leaves and debris must be removed so they don’t affect speed. Natural greens require far more attention—regular mowing at very low heights, aeration, topdressing, and careful watering schedules. Before you commit, be honest about how much time you’re willing to invest. The goal is enjoyment, not another household chore you dread.
Make It Part of Your Lifestyle
Once the green is complete, integrate it into daily life. Spend ten minutes each morning rolling a few putts before work, or invite neighbors over for friendly competitions. Add simple seating, pathway lighting, or a shade umbrella to create a welcoming atmosphere. Many families find that the green becomes a social hub where kids put down their phones and adults unwind after long days.
Enjoy the Long-Term Rewards
A backyard putting green offers more than just entertainment. Regular practice at home can dramatically improve confidence on the course, especially inside ten feet where matches are won and lost. Beyond golf, the green enhances curb appeal and can even increase property value. Most importantly, it provides a personal retreat—a small patch of calm where you can focus, breathe, and reconnect with a game you love.
Turning the dream into reality doesn’t happen overnight, but each step brings you closer to that first satisfying putt in your own backyard. With planning, patience, and a bit of creativity, the vision of having a private green only a few steps from the kitchen can move from wish list to everyday pleasure.