A strong Harley shouldn’t groan when you hit the ignition. If you’re hearing clicking, grinding, or worse, nothing at all, your starter might be the problem. The good news? You don’t need a garage full of tools or a shop appointment to fix it.
Replacing a Harley starter at home is easier than it sounds. With the right part and some care, you can get back to the road faster, and with money saved.
Let’s break it down step by step.
But First, What’s a Starter and Why Does It Fail?
The starter is what turns your engine over and gets the combustion process going. If it’s weak or worn, your bike won’t start, no matter how new your battery is.
Common signs of starter trouble:
- Clicking sound but no crank
- Engine slow to turn over
- No response at all
- Occasional starts followed by silence
Starters wear out over time, especially if you ride often or ride hard. It’s not about bad riding; it’s about aging parts doing a tough job.
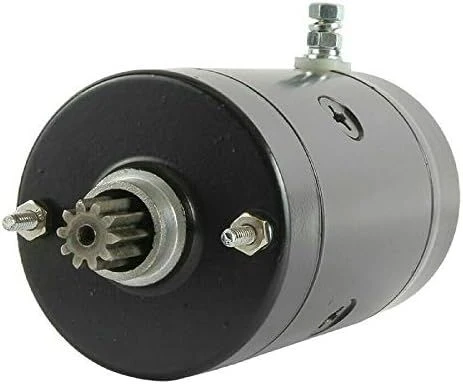
Before You Begin: Choose the Right Starter
If you're in North Carolina, you can easily find a premium Harley Davidson starter 12V NC that fits your model. From classic cruisers to touring beasts, a 12V starter gives you the crank power you need for a smooth ignition every time.
Make sure the part matches your bike’s year, engine size, and starter mount style.
You can often grab one through an online sale for a Harley Davidson starter in NC, saving time and a trip across town.
What You’ll Need
- Socket wrench and Allen keys
- Torque wrench (optional but helpful)
- Loctite or thread locker
- Clean workspace
- New starter (of course)
How to Replace a Harley Starter in 6 Simple Steps
Step 1: Disconnect the Battery
Always start by removing the negative terminal. This keeps you safe and avoids shorts.
Step 2: Remove the Primary Cover
If your model has a primary chaincase over the starter, you’ll need to remove it. Drain the fluid first, then remove the bolts holding the primary cover.
Set aside the cover carefully to avoid damage to the gasket.
Step 3: Take Out the Old Starter
Unbolt the starter from the transmission side of the engine. It’s usually held in with two bolts.
Once it’s loose, gently pull it away from the engine. Disconnect the starter cable from the solenoid.
Step 4: Clean the Mounting Area
Before installing the new part, clean the starter mounting surface. Make sure there’s no debris or oil where the new starter will sit.
This helps you get a solid connection and clean install.
Step 5: Install the New Starter
Place the new starter in the same position. Connect the starter cable and apply thread locker to the bolts.
Tighten the bolts evenly to manufacturer specs. A torque wrench can help here if you have one.
Step 6: Reconnect the Battery and Test
Once everything is secure, reconnect the battery. Hit the starter switch and listen.
A strong, clean start means your job is done right.
Quick Tips for a Smooth Install
- Take photos before removing anything. It helps with reassembly.
- Use gloves to avoid leaving oil on connections.
- Check your battery health too, sometimes it's not just the starter.
Final Word
You don’t have to be a pro to give your Harley new life. A quiet or clicking starter doesn’t have to ruin your ride plans. With the right tools, a steady hand, and the right 12V replacement, you can swap the old part out and ride like nothing ever happened.
Many riders go for an online sale for a Harley Davidson starter in NC to get the part fast. And when it’s a premium Harley Davidson starter 12V NC, you can trust it to hold up over time.
So if your bike’s been giving you trouble, don’t wait. Six steps are all it takes to make your Harley roar again.