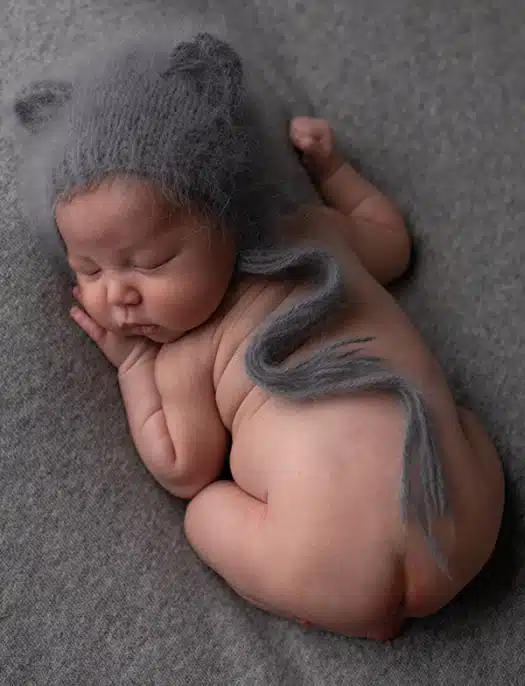
Newborn photography is a delicate art, capturing the fleeting moments of a baby’s earliest days. However, even the most perfectly timed photo can have tiny blemishes, redness, or uneven skin tones that distract from the natural charm. This is where newborn retouching comes in—a professional editing process designed to enhance a newborn’s photos while keeping their natural beauty intact.
Unlike standard photo editing, newborn retouching requires finesse. Overdoing edits can result in artificial, unnatural-looking skin, stripping away the baby’s authenticity. Experts emphasize subtle enhancements: smoothing minor skin imperfections, balancing colors, and preserving delicate features like tiny fingers, hair, and eyelashes. With the right techniques, photographers and parents can achieve images that are both flawless and genuine, perfect for albums, announcements, or keepsakes.
In this guide, we explore the best practices, techniques, and tips for newborn retouching, helping photographers and parents understand how to create lasting, heartwarming memories without compromising authenticity.
Pixretouch, we are experienced with 12+ years in this field
What is Newborn Retouching?
Newborn retouching is the process of digitally refining baby photos to enhance their natural appearance. This involves:
- Skin smoothing: Gently reducing redness, rashes, or flakiness without erasing natural texture.
- Color correction: Balancing warm and cool tones to replicate real-life skin hues.
- Background enhancement: Removing distractions, adjusting lighting, or softening backgrounds.
- Feature emphasis: Highlighting eyes, lips, and tiny details that add charm to the image.
Unlike adult portrait retouching, newborn edits require extra care. Over-editing can lead to “plastic” or unnatural looks, which defeat the purpose of capturing a newborn’s innocence.
Expert Tip: Always work on a duplicate layer in editing software, so you can compare before-and-after results without losing original textures.
Step-by-Step Newborn Retouching Process
1. Preparation and Raw Editing
Before retouching, ensure the photo is properly exposed, cropped, and in focus. Adjust white balance, contrast, and brightness minimally to create a clean base.
2. Gentle Skin Smoothing
Use tools like frequency separation or healing brushes. Focus on:
- Temporary blemishes
- Minor rashes
- Dry or flaky skin
Avoid completely erasing the baby’s natural texture. Subtlety is key.
3. Color Correction and Tone Adjustment
Enhance skin tones while maintaining realism:
- Neutralize redness or yellowing
- Adjust warmth for soft, natural light
- Enhance highlights in eyes and lips
4. Background Refinement
Remove clutter or distracting elements. Add soft vignettes if needed to draw attention to the baby.
5. Fine Details and Sharpening
Enhance tiny features: eyelashes, lips, and fingers. Keep sharpening minimally—too much creates harsh textures.
6. Final Review
Zoom in and review at 100% scale to ensure edits are natural. Compare before-and-after images to confirm balance and authenticity.
Common Mistakes in Newborn Retouching
MistakeHow to Avoid Over-smoothing skinRetain some natural texture; smooth only major imperfections, inconsistencies, calibrated monitors, and adjust tones carefully. Over-sharpening: Apply subtle sharpening selectively on eyes or lips. Ignoring lighting. Correct exposure and shadows before retouchingBackground distractions clutter without unnatural cropping
FAQs About Newborn Retouching
❓ How much retouching is too much for newborn photos?
Moderation is key. Minor blemishes and uneven skin tones should be corrected, but natural textures must remain. Over-editing creates an unrealistic, artificial look.
❓ What software is best for newborn retouching?
Adobe Photoshop, Lightroom, and Luminar are top choices. Photoshop is ideal for detailed edits, while Lightroom handles color correction and exposure efficiently.
❓ Can newborn retouching remove birthmarks or moles?
Yes, but it’s recommended only if parents request it. The goal is subtle enhancement, not changing natural identity.
❓ How long does professional newborn retouching take?
It depends on the complexity. Simple edits may take 15–30 minutes per photo, while detailed corrections and background refinements can take 1–2 hours.
❓ Should I retouch all newborn photos?
Not necessarily. Focus on key portraits or keepsake images. Over-editing every photo can be time-consuming and unnecessary.
Conclusion: Preserving Memories with Newborn Retouching
Newborn retouching is a vital tool for photographers and parents who want timeless, heartwarming images of their baby’s first days. The key is subtlety, authenticity, and attention to delicate details. By carefully smoothing skin, adjusting tones, and refining backgrounds, you can create stunning photos that capture a newborn’s innocence and charm.
📢 Ready to preserve your baby’s precious moments? Explore professional newborn retouching services today to ensure your photos remain flawless, natural, and unforgettable.