Building a Mac Mini AI Workstation with a KVM Switch Setup

avaccess
·
7 min read
·
85 Buzz
Introduction
Over the past few months, I’ve noticed a growing number of developers, creators, and tech enthusiasts building dedicated AI workstations at home. As local AI tools become more accessible, running models on your own hardware is no longer limited to high-end servers or enterprise environments. Projects like OpenClaw and other self-hosted AI platforms have made it easier than ever to experiment with AI workflows locally.
That trend eventually influenced my own setup. Rather than running everything on a single computer, I decided to build a dedicated AI workstation around a Mac Mini M3 while keeping my laptop focused on everyday work, such as meetings, content creation, email, and project management.
The idea sounded straightforward, but once two computers, two monitors, and a collection of peripherals entered the picture, managing the workspace became more complicated than expected. This article shares how I built my Mac Mini AI workstation, the challenges I encountered while working across two systems, and how a KVM switch helped bring everything together into a setup that feels much more practical for everyday use.
Why I Built a Mac Mini AI Workstation Instead of Upgrading My Laptop
The decision was not really about performance alone.
My work laptop was already capable of handling most daily tasks without issues, but once I started running more AI-related workloads, especially local model testing and automation workflows, I noticed a clear limitation in how I was using it. Everything was competing for the same resources, from browser tabs and video calls to background AI processes.
Instead of upgrading a laptop that already served a different purpose, I decided to separate the workloads. The idea was simple. Let one machine focus on AI tasks, and let the other remain stable for everything else.
The Mac Mini M3 turned out to be a practical choice for this role. It runs quietly, takes very little space on the desk, and offers enough performance headroom for the kind of lightweight AI experiments I usually run, including local inference, coding assistance tools, and small-scale model testing.
My Mac Mini AI Workstation Setup
The current setup is fairly minimal but intentionally structured.
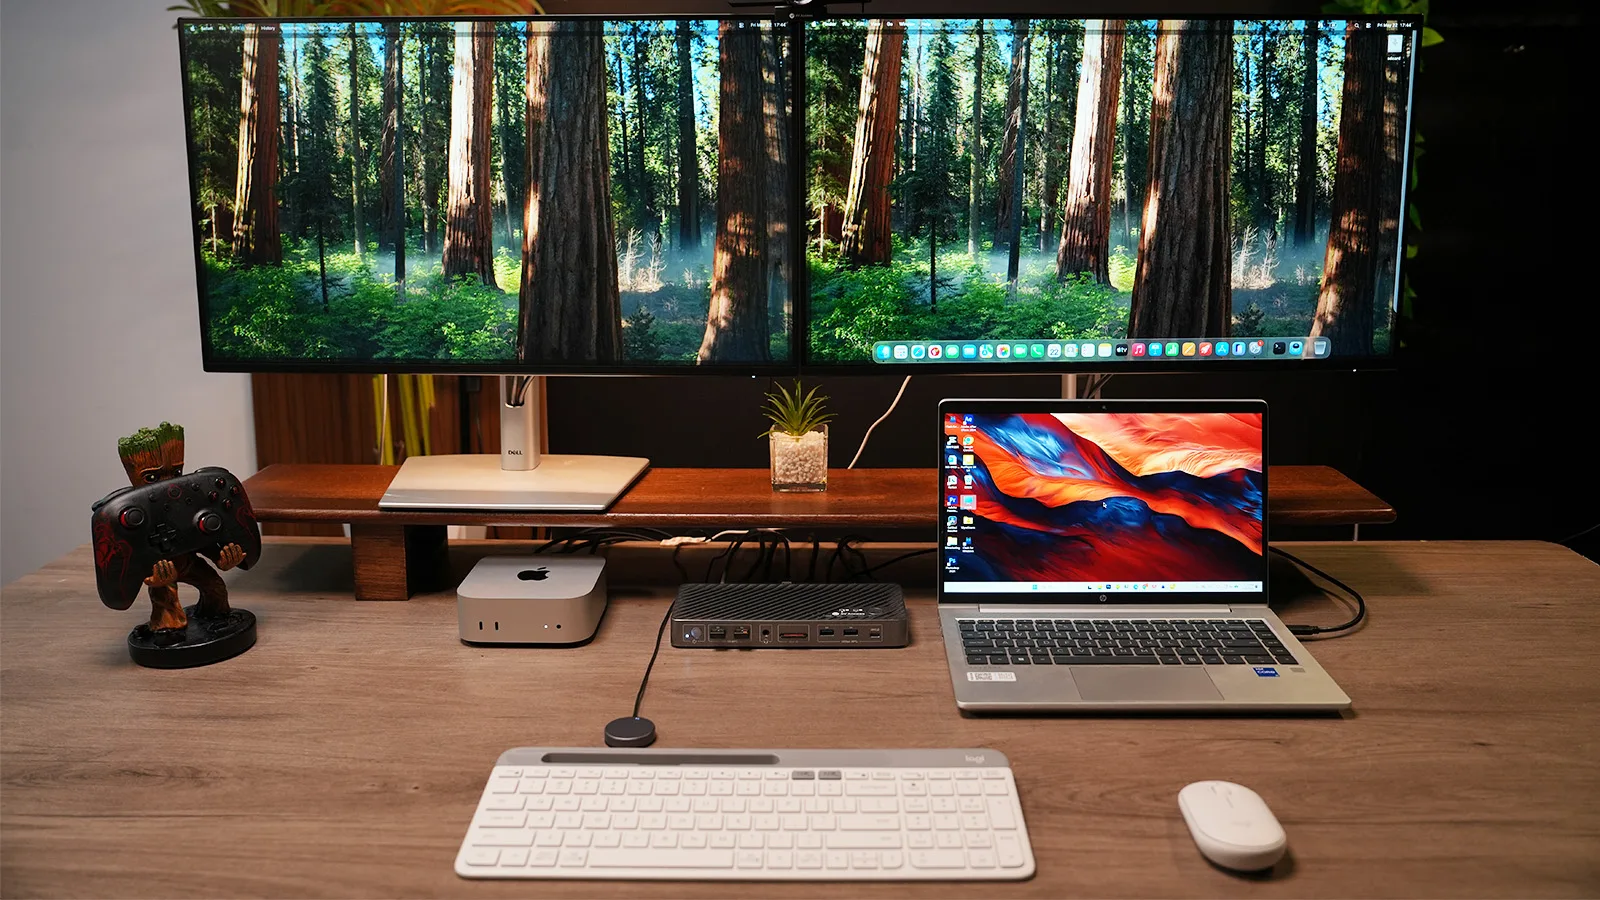
The Mac Mini M3 is dedicated to AI-related work such as running local models, testing prompts, experimenting with automation tools, and handling longer background tasks that do not need constant attention. On the other side, my laptop is still responsible for everything related to communication, meetings, documentation, and general productivity work.
Both systems share a dual-monitor setup, which is important for how I actually work throughout the day. I usually keep one screen for active tasks and the other for reference materials, logs, or outputs from AI tools.
In addition to the computers and monitors, the desk setup includes a single keyboard, a mouse, a webcam, and a wired Ethernet connection. The goal was to avoid duplicating peripherals while still keeping both systems fully usable when needed.
The problem is that once everything is connected, switching between two computers starts to become a real challenge.
Why a KVM Switch Became Essential for My AI Workstation
This is where the real friction appeared.
When you are working between a Mac Mini and a laptop, the switching process is not just about changing screens. It includes monitor input selection, USB device reconnection, network changes in some cases, and constantly reorienting your workspace depending on which system is active.
At first, this does not feel like a big issue. But when you repeat it dozens of times in a single day, especially during AI experimentation where you frequently switch between running tasks and reviewing outputs, it becomes a constant interruption.
What I needed was not just convenience, but continuity. I wanted both systems to feel like part of a single workstation, where everything follows the active computer without extra steps.
That requirement naturally led me to KVM switches and eventually to the iDock B10.
How iDock B10 Simplified My Mac Mini AI Workstation Workflow
The AV Access iDock B10 fits into a very specific use case, which is one laptop and one desktop sharing the same workspace. In my case, that aligns perfectly with a Mac Mini M3 and a work laptop.
According to AV Access, the iDock B10 supports dual system switching, dual-monitor output, USB peripheral sharing, and up to 100W laptop charging through USB-C. It also provides shared Gigabit Ethernet so both systems can stay connected to a stable wired network without needing separate Ethernet setups. For display performance, it supports up to 4K@165Hz and 1080P@240Hz, which covers both productivity and high-refresh-rate use cases.
One-button switching between Mac Mini and laptop
The most noticeable change was simply how fast switching became.
Instead of manually changing inputs or reconnecting cables, I can switch both monitors and all peripherals with a single action. Over time, this removes a surprising amount of small interruptions from the workflow.
Dual-monitor support for a consistent workspace
Both systems share the same dual monitors, which means I do not need to mentally reorganize my workspace every time I switch machines. I can keep my workflow structure consistent whether I am on the Mac Mini or the laptop.
Shared peripherals across both systems
Keyboard, mouse, webcam, and other USB devices are all shared, which keeps the desk much cleaner than a dual setup with duplicated accessories. It also reduces the mental overhead of maintaining two separate environments.
Charging the laptop through USB-C
One of the more practical benefits is that the laptop stays charged while connected. I no longer need a separate charger on the desk, which simplifies cable management more than I expected.
High refresh rate support for both productivity and leisure
Even though this setup is mainly for AI work and office productivity, the display support still matters. The ability to run 4K@165Hz or 1080P@240Hz means the same setup can handle both work and personal use without compromise.
Shared Gigabit Ethernet for both systems
This turned out to be more important than I initially thought.
The Mac Mini often handles AI model downloads and background processing, while the laptop remains active for communication and cloud-based tools. Having both systems share a stable 1Gbps wired connection removes the need to manage separate network cables or rely on WiFi for one of the machines.
AV Access iDock B10 Specifications
Category Specification
Model Name AV Access iDock B10
Product Type Dual Monitor KVM Docking Station
Primary Use Case Gaming + Productivity (Laptop + Desktop)
Laptop Input USB-C (USB 3.2 Gen 2 / DP Alt Mode / 100W PD)
Desktop Video Inputs DisplayPort + HDMI
Desktop Host Data Input USB-A (Host Connection)
Video Outputs 2× HDMI 2.1
Max Resolution Supports 8K@60Hz/4K@165Hz/1440P@240Hz
Power Delivery (Laptop) Up to 100W
USB Ports USB-A 3.2×3 / USB-A 3.0×2 /USB-C×1
Other Ports SD Card Reader/ 3.5mm Headphone/ 1 Gigabit LAN Port
EDID Management No
Switching Method Physical Button + Wired Remote Button
Display Sync Support Adaptive Sync / G-SYNC / FreeSync (depending on GPU/Monitor)
Operating Systems Supported Windows, macOS (varies with dual external displays)
My Daily Workflow with a Mac Mini AI Workstation and KVM Switch
A typical day usually starts on the laptop, where I handle messages, meetings, and planning. Meanwhile, the Mac Mini is often running AI-related tasks in the background, whether that is processing models, testing workflows, or generating outputs.
Throughout the day, I switch back and forth depending on what I need to do. When I want to check results or adjust AI prompts, I move to the Mac Mini. When I return to writing or communication tasks, I switch back to the laptop.
What changed is not just the setup but the rhythm of work. Instead of thinking about two separate computers, I now think in terms of one workspace that adapts to whichever system I need at the moment.
Building-a-Mac-Mini-AI-Workstation-with-a-KVM-Switch-Setup
Is a KVM Switch Worth It for a Mac Mini AI Workstation?
If you only use a single computer, a KVM switch is probably unnecessary.
But if your workflow involves a dedicated AI machine like a Mac Mini and a separate laptop for daily work, the situation is different.
In my case, the biggest value was not hardware consolidation, but workflow stability. Once switching becomes seamless, you stop thinking about the setup itself and start focusing on actual work again.
That is where a Mac Mini AI workstation paired with a KVM switch like the iDock B10 makes sense. It is not about adding complexity, but about removing friction from a setup that naturally grows more complex over time.
FAQs
1. Is the AV Access iDock B10 a good KVM docking station for an AI assistant workstation?
Yes. The iDock B10 works well for AI assistant workstations that combine a laptop with a desktop or Mac mini. It allows both systems to share monitors and peripherals while supporting high-resolution, high-refresh-rate displays, making it easier to switch between AI workloads and daily work without disrupting workflow.
2. How should I connect a Mac Mini to the iDock B10 in a dual-system setup?
The iDock B10 includes the necessary video cables for a desktop setup, typically using HDMI and DisplayPort connections for a traditional PC. However, when using a Mac Mini, the connection setup is slightly different because the Mac Mini relies on USB-C (Thunderbolt) for video output instead of native DisplayPort input.
In this case, you will need to use a USB-C to DisplayPort cable (or a compatible USB-C to HDMI adapter, depending on your monitor configuration) to connect the Mac Mini to the iDock B10.
Once connected properly, the Mac Mini can share the same dual-monitor setup and peripherals through the KVM switch, just like a standard desktop computer. This allows both the Mac Mini AI workstation and the laptop to operate within the same switching system without needing separate display setups.
3. Does the iDock B10 support high-performance displays for work and gaming?
Yes. The iDock B10 supports up to 4K@165Hz and 1080P@240Hz display output, which makes it suitable not only for productivity tasks but also for high refresh rate use cases. Whether you are working on an AI workstation, editing content, or using the same setup for casual gaming, it maintains smooth visual performance across both connected systems.