


Stamped concrete is more than just a decorative upgrade—it’s a game-changer for driveways, patios, walkways, and pool decks. If you want a surface that mimics high-end materials like brick, slate, or stone without the cost and maintenance, stamped concrete is your go-to solution. But here’s the catch: your finished surface is only as good as the installation behind it.
In this comprehensive guide, we’re diving into pro-level stamped concrete installation tips that don’t just make the job easier; they deliver jaw-dropping, long-lasting results. Whether you're a DIY enthusiast or a contractor sharpening your skills, these techniques will elevate your next project.
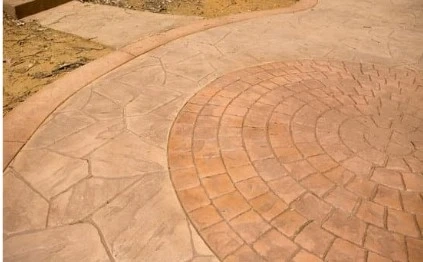
What Is Stamped Concrete and Why Is It So Popular?
Stamped concrete is poured concrete that’s textured or patterned to resemble more expensive materials like cobblestone, flagstone, tile, or even wood. It combines the durability of concrete with the visual appeal of luxury finishes, without breaking the bank.
Why Homeowners and Contractors Love It:
- Affordable alternative to natural stone or pavers
- Customizable colors and patterns
- Low maintenance once sealed properly
- Ideal for both residential and commercial spaces
1. Plan with Purpose: Start with a Vision
Before you break ground, have a clear vision of what you want. Ask yourself:
- What pattern fits the surrounding architecture?
- What color complements the home exterior?
- Will the area experience heavy foot or vehicle traffic?
Pro tip: Use a mock-up board to test out pattern and color combos before committing to the full pour. This eliminates guesswork and ensures everyone is on the same page.
2. Choose the Right Pattern and Texture for Your Space
Not all patterns work for every application. Large stone patterns may overwhelm a small patio, while tight brick designs might not suit a sprawling driveway.
Popular Stamped Concrete Patterns:
- Ashlar slate – Elegant and timeless
- Cobblestone – Classic old-world charm
- Wood plank – Rustic, warm vibes
- Seamless textures – Modern and clean
Match your pattern with the scale. For example, a large patio may benefit from broader patterns that don’t look too “busy.”
3. Focus on a High-Quality Subbase
Your concrete is only as strong as what it sits on. For lasting results, proper base preparation is critical. A compacted gravel base of 4 to 6 inches is usually sufficient for most residential applications.
Checklist for Subbase Prep:
- Excavate to the proper depth (typically 6-8 inches)
- Remove all soft spots and organic matter
- Compact in layers using a plate compactor
- Use landscape fabric to reduce weed growth and soil movement
Don’t cut corners here. Skimping on your base is asking for cracks down the line.
4. Use the Right Concrete Mix Design
Stamped concrete should have a compressive strength of at least 4000 psi. You’ll also want to add plasticizers or water reducers to improve workability without adding too much water (which can weaken the final product).
Bonus Tip:
Consider adding fiber reinforcement to the mix for added durability, especially in freeze-thaw climates.
5. Timing Is Everything—Know When to Stamp
The biggest rookie mistake? Stamping too early or too late.
How to Know the Concrete Is Ready:
- Surface sheen is gone
- Concrete can hold a fingerprint impression ½ inch deep
- It springs back slightly when pressed
Stamping too early can cause slippage and distortion. Too late, and you’ll need a jackhammer to press in your texture mats.
Pro tip: Use a hand float to test readiness in different sections before laying out your stamps.
6. Apply Color Like a Pro
Color is where stamped concrete really comes to life. There are two main coloring methods:
Integral Color:
- Mixed directly into the concrete batch
- Ensures consistent color throughout the slab
- Won’t fade or wear off
Color Hardener:
- Broadcasted onto the surface during finishing
- Offers more vibrant, stronger surface color
- Increases surface strength
Many pros use both for depth and durability. Add an antiquing release agent in a darker tone to give that realistic, aged appearance to joints and crevices.
7. Use Quality Stamps, and Use Them Correctly
Not all stamping tools are created equal. Invest in durable, professional-grade stamping mats with clean edges and crisp patterns.
Stamping Tips:
- Use enough mats to cover the entire slab width
- Rotate stamp mats to avoid repeat patterns
- Walk the mats into place for even pressure
- Tap gently with a tamper for full texture transfer
Avoid dragging or twisting the stamp—this can smear your design and ruin all your hard work.
8. Seamless Transitions and Borders Matter
Adding clean borders or seamless texture transitions enhances the finished look and gives the project a custom, high-end feel.
Design Enhancements to Consider:
- Contrasting border colors
- Different pattern inlay for steps or landings
- Radius or curve cuts for organic flow
Don’t overlook borders, they can take your project from “meh” to magazine-worthy.
9. Don’t Skip Control Joints (But Hide Them Well)
Concrete expands and contracts. To prevent random cracking, you need control joints.
Best Practices:
- Place joints every 4–6 feet, depending on slab thickness
- Use tools to match joints with the stamped pattern
- Consider saw cutting for clean, disguised joints
Strategic placement is key—hide them within grout lines whenever possible.
10. Seal It for Longevity and Shine
Sealing your stamped concrete protects the surface from stains, moisture, and UV damage, and gives it that rich, wet look.
Sealer Tips:
- Wait at least 24–48 hours after stamping to apply sealer
- Use a non-yellowing acrylic sealer for most outdoor applications
- Apply in thin coats with a sprayer or roller
Re-seal every 2–3 years to maintain shine and protection. Avoid over-sealing, which can cause clouding or slipperiness.
11. Regular Maintenance Goes a Long Way
Stamped concrete is low-maintenance, but not zero-maintenance.
Simple Maintenance Routine:
- Sweep or blow off debris weekly
- Power wash gently when needed
- Reseal as required
- Use non-deicing salt alternatives in winter
Caring for your investment ensures it continues to impress for years.
12. Avoid These Common Stamped Concrete Mistakes
Even experienced pros slip up. Watch out for these costly errors:
- Overworking the surface and pushing the color hardener out
- Poor stamp alignment leading to distorted patterns
- Skipping base prep, resulting in sinking and cracks
- Rushing the process, quality takes time
Each mistake can turn a beautiful project into a redo. Take your time and follow best practices.
Conclusion: Bring Your Vision to Life with Precision
Stamped concrete offers incredible versatility and curb appeal—but only if installed correctly. From subbase prep and coloring to stamping and sealing, each phase of the process matters.
By following these expert installation tips, you’ll not only achieve a surface that looks amazing, but you’ll create one that lasts. Whether you're upgrading your home’s exterior or taking on a client project, mastering stamped concrete techniques can elevate your work and wow every onlooker.
So grab those tools, plan every detail, and get ready to make a lasting impact, one stamp at a time. For expert guidance and professionally stamped concrete services, visit Sioux Falls Concrete Contractor.