


If you want a lawn that makes your neighbors seethe with envy, you have to stop trying and start executing. In Canada, we don't have the luxury of a 12-month growing season. We have narrow windows, aggressive clay, and winters that want to heave your turf into the next province. This guide is the antidote to mediocre landscaping.
The Brutal Reality of Site Preparation
Most people fail before the first pallet even arrives. They think a quick rake and a prayer will suffice. Wrong. If your soil isn't right, your sod is just expensive compost waiting to happen.
Grading and Drainage: The Hidden Killers
You need to analyze your land like a forensic engineer. Water is your best friend during installation but your worst enemy if it pools. You must slope the ground away from your foundation, aiming for a 2% grade. That’s a 2-inch drop for every 10 feet of distance.
Take a hard look at your landscape. Your soil level should sit exactly 1 inch below your driveway, walkways, and patios. Why? Because sod has thickness. If you prep flush to the concrete, your grass will sit an inch high, creating a tripping hazard and a drainage nightmare that looks amateur.
The Clay Conundrum (Ontario & The Prairies)
If you’re digging in Southern Ontario or the Calgary area, you’re likely fighting heavy clay. It’s dense. It’s suffocating. It turns into a brick in August. You cannot just lay Kentucky Bluegrass on top of it.
- The Fix: You need at least 4 to 6 inches of high-quality topsoil and organic compost.
- The Test: Squeeze a handful of moist soil. If it stays in a hard, sticky ball, add more organic matter. If it crumbles slightly, you’re ready.
Step 1: Measuring Like a Pro (The 10% Rule)
Stop guessing. Grab a long measuring tape or a rolling wheel. Calculate your square footage by breaking your yard into rectangles.
Total Square Feet + 10% = Your Order.
That extra 10% isn't just in case. It covers the inevitable waste from cutting curves, filling odd corners, and the occasional roll that arrives looking like it went through a blender. For luxury estates with complex garden beds, bump that to 12%.
Step 2: The 6-Hour Delivery Window
Sod is perishable. The moment it’s cut at the farm, the clock starts ticking. In the heat of a Canadian July, a pallet of sod can go into heat stress within hours.
When that truck arrives, those rolls need to be in the shade. If you can’t lay it all in one day, you’ve already lost. Plan your labor accordingly. Don't let those pallets sit on your hot driveway, the heat radiating from the asphalt will cook the roots from the bottom up.
Step 3: Proper Installation Mechanics
This is where the art happens. If you’ve used our sod installation companies near me services before, you’ve seen our crews move with a specific rhythm. There is a reason for it.
The Straight Edge Strategy
Find the longest straight line on your property. Usually, this is a fence or the side of the house. Lay your first row there. If you start crooked, every subsequent row will be a disaster of gaps and overlaps.
The Brick-Work Pattern
Never, under any circumstances, align your seams. You must stagger the joints like a brick wall.
- Why? Staggered seams prevent water from carving channels between the rolls during heavy rain.
- The Technique: Start every second row with a half-length piece. This ensures no four corners ever meet in a cross pattern.
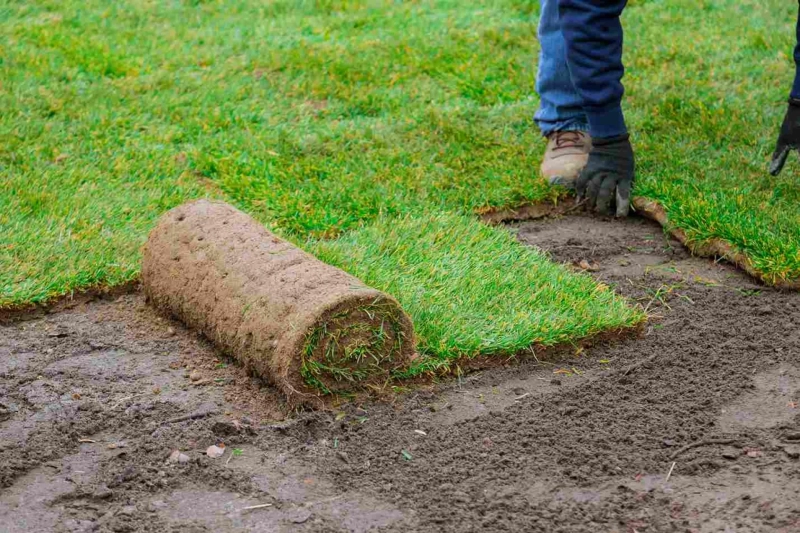
The Tuck and Butt
Do not overlap the edges. Do not leave gaps. You want the edges to butt up against each other tightly. I tell my crews to tuck the grass blades under slightly so the soil-to-soil contact is absolute. If you see dirt between your rolls, you’ve failed.
Step 4: The Tool You’re Ignoring (The Roller)
Once the sod is down, it looks finished. It isn’t. Between the fresh sod and your prepared topsoil, there are millions of tiny air pockets. Air kills roots.
You must use a lawn roller. Fill it about one-third full with water. Roll the entire area, twice. Once vertically, once horizontally. This weight presses the roots into the soil, ensuring they can actually drink the water you’re about to give them.
Step 5: The Critical 21-Day Establishment Phase
The first three weeks determine the next ten years. You are now a slave to your irrigation.
The First Soak
Within 30 minutes of laying the first roll, get the water on it. Don't wait until the whole yard is done. If you have a large property, have someone watering the finished sections while you continue laying the rest.
During Days 1 to 7, you must keep the sod sponge-wet by watering 2 to 3 times daily. Never let it dry out. From Days 8 to 14, transition to deep watering once daily to encourage roots to stretch downward into the earth. Finally, during Days 15 to 21, reduce frequency to every other day as you move toward a standard maintenance schedule. The goal is simple: the soil underneath must be moist to a depth of 4 inches at all times during that first week.
Step 6: When Can I Mow?
Patience is a rare commodity, but you need it here. Do not walk on your new lawn for at least two weeks. You’ll leave permanent footprints in the soft, saturated soil.
Around day 14, perform the Tug Test. Grab a handful of grass and pull up gently.
- If it lifts easily: It’s not ready. Keep watering.
- If you feel resistance: The roots have knitted into the soil.
Set your mower to its highest setting (usually 3 to 3.5 inches). You only want to clip the very tips. Never remove more than one-third of the grass blade at once, as this shocks the plant and halts root production.
Technical Specs for the Enthusiast
If you’re serious about this, you need to understand the numbers. According to the Lawn Care Institute, successful establishment requires a soil temperature between 15°C and 24°C. In Canada, this usually means late May through June, or the early weeks of September.
Avoid high-nitrogen fertilizers immediately after installation. You want a starter fertilizer with a higher middle number (Phosphorus) to stimulate root growth rather than top-growth. Think $10-20-10$ or similar ratios.
Why Most DIY Efforts Fail
- Poor Soil Contact: If the ground is lumpy, the sod sits on peaks, and the roots in the valleys never touch dirt. They wither and die.
- Starvation: People forget that sod is a hungry, living thing. If you didn't put down a starter fertilizer on the bare soil before laying the turf, your grass is starting its life in a deficit.
- The Dry Edge Effect: The edges of your lawn, next to the driveway or sidewalk, get much hotter than the rest of the yard. They dry out first. You must hand-water these perimeters.
Common Questions from Canadian Homeowners
Q: Can I lay sod over my existing grass?
No. This is the fastest way to waste five thousand dollars. The old grass will rot, create heat, and breed fungus that will kill your new sod from the bottom up. Strip it to the bare dirt.
Q: What is the best type of sod for Ontario?
Most reputable farms in the GTA and surrounding areas grow a Kentucky Bluegrass/Fine Fescue blend. It’s the Goldilocks of grass, hardy enough for the cold, but soft enough for a luxurious feel.
Q: How much does it cost to have it done right?
While prices fluctuate based on fuel and fertilizer costs, expect a professional installation to be a significant but worthy investment in your property's value.
Final Thoughts from the Field
Installing a lawn isn't rocket science, but it is labor-intensive and unforgiving. If you skip a step, the results will show in six months when the weeds start poking through the gaps or the grass turns a sickly straw color.
If you’re looking at your yard and realizing it’s a bigger job than a weekend and a rented truck can handle it, don't sweat it. At Harry’s Lawn Care, we’ve spent years perfecting the forensic install. We handle everything from the initial soil pH testing to the final rolling, ensuring your property gets that lush, deep-green carpet it deserves.
Don't settle for a patchy yard. If you want it done right the first time, without the back-breaking labor, reach out to us for a custom solution. Let’s build a lawn that actually lasts.