


If you’ve ever wondered what radon testing actually involves—or why so many home inspectors and health organizations emphasize it—you’re not alone. Radon is one of those invisible home hazards that rarely gets attention until. Radon is one of those invisible home hazards that rarely gets attention until it’s too late. Yet, testing for it is simple, affordable, and could quite literally save lives.
In this guide, we’ll break down everything you need to know about radon testing, from what radon is and why it’s dangerous, to how you can test your home step by step. Whether you’re a first-time homeowner or have lived in your house for decades, this article will give you a clear, confident path to a radon-safe home.
What Is Radon—and Why Should You Care?
Radon is a naturally occurring radioactive gas that forms when uranium in soil, rock, and water breaks down. It seeps into your home through cracks in the foundation, gaps in floors or walls, and even through your water supply.
What makes radon so concerning is that it’s completely invisible and odorless. You can’t see it, smell it, or taste it—but it can accumulate to dangerous levels indoors.
According to the U.S. Environmental Protection Agency (EPA), radon is the second leading cause of lung cancer after smoking. In fact, it’s responsible for roughly 21,000 lung cancer deaths each year in the United States alone. For non-smokers, radon is the number one cause of lung cancer.
So yes—this silent gas deserves your attention.
How Does Radon Enter Your Home?
Radon comes from the ground beneath your home. As uranium in soil breaks down, radon gas is released and seeps upward. When your house traps that gas inside, levels can quickly build up.
Here are the most common entry points:
- Cracks in concrete floors or foundation walls
- Construction joints and gaps around service pipes
- Crawl spaces and sump pits
- Openings around drains and utility penetrations
- Even well water in some cases
Once inside, radon tends to collect in lower areas, such as basements and first floors—especially in homes with poor ventilation.
The Health Risks of Radon Exposure
You might wonder: “If I’ve lived here for years, shouldn’t I be fine?” Unfortunately, radon exposure is a long-term health risk, not an immediate one.
When radon gas is inhaled, its radioactive particles get trapped in your lungs. Over time, this exposure damages lung tissue and increases the risk of lung cancer. The risk grows with both higher radon levels and longer exposure.
Here’s how the EPA classifies risk levels:
- Below 2 pCi/L – Generally considered low risk
- 2–4 pCi/L – Action may be recommended
- Above 4 pCi/L – Immediate mitigation is advised
Even if your levels are “moderate,” experts recommend taking steps to reduce exposure. No level of radon is entirely safe.
Why Every Home Needs Radon Testing
Radon isn’t just a “somewhere else” problem. In reality, every home is at risk, regardless of age, style, or location. Even homes next to each other can have completely different radon levels due to variations in soil composition and air pressure.
That’s why the EPA and World Health Organization (WHO) both recommend testing every home at least once—especially after major renovations, foundation work, or changes in ventilation systems.
If you’re buying or selling a home, radon testing is an essential part of the inspection process. A clean radon report not only protects your health but can also boost property value and buyer confidence.
Types of Radon Tests: Which Is Right for You?
Before diving into how to test for radon, it’s important to understand your testing options. There are two main categories: short-term and long-term tests.
1. Short-Term Radon Tests
- Duration: 2–7 days
- Best for: Quick results or initial screening
- Cost: $10–$30 for DIY kits
Short-term tests are simple and effective for a fast snapshot of radon levels. They’re ideal for homeowners who want to know if further testing is necessary.
2. Long-Term Radon Tests
- Duration: 90 days to 1 year
- Best for: Accurate year-round average
- Cost: $25–$60
Because radon levels fluctuate with seasonal changes, long-term tests give the most accurate measure of your home’s true exposure.
3. Continuous Radon Monitors
- Duration: Continuous readings
- Best for: Detailed, real-time data
- Cost: $100–$300+
These electronic monitors provide digital readouts and track radon variations over time. They’re great for ongoing monitoring and professional use.
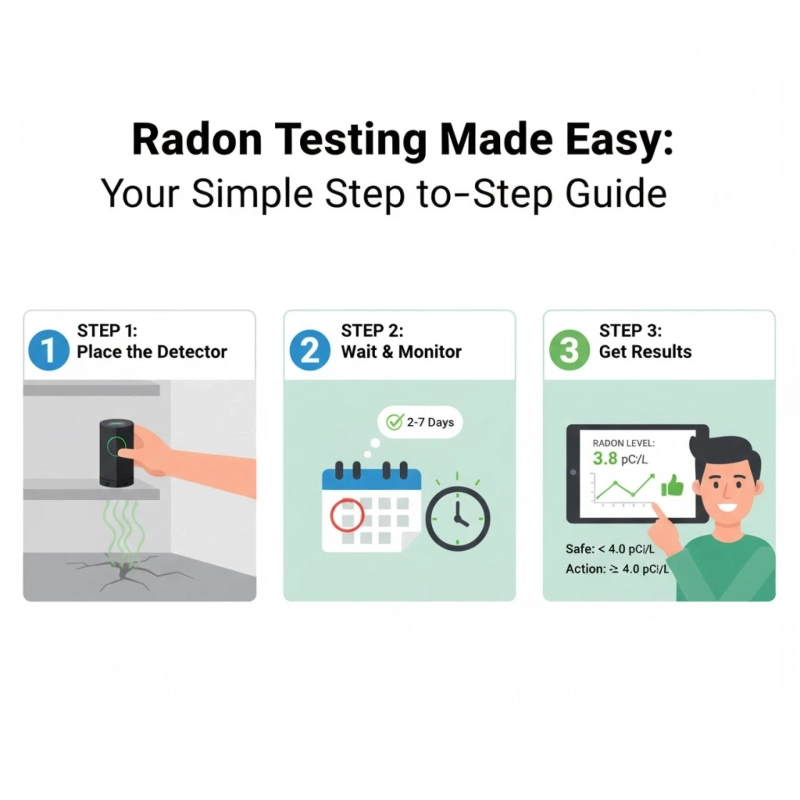
Step-by-Step Guide to Testing Your Home for Radon
Now that you understand the basics, let’s walk through how to perform a radon test from start to finish.
Step 1: Choose Your Test Kit
You can buy a radon test kit from:
- Online retailers (Amazon, Home Depot, etc.)
- Local hardware stores
- State radon programs or health departments
Make sure your kit is EPA-approved or National Radon Proficiency Program (NRPP) certified.
Step 2: Pick the Right Testing Location
Select a lowest livable level of your home—typically a basement or ground floor. Avoid bathrooms, kitchens, or laundry rooms since humidity and airflow can skew results.
Place the test kit:
- At least 20 inches above the floor
- Away from windows, doors, and vents
- 3 feet or more from exterior walls
Step 3: Set Up Proper Testing Conditions
For accurate results, follow these simple rules:
- Keep windows and doors closed (except for normal entry/exit)
- Avoid using fans or ventilation systems that bring in outside air
- Maintain normal living conditions during the test
If you’re using a short-term test, do this for the entire testing period.
Step 4: Wait for the Recommended Test Duration
Depending on your kit type, you’ll need to wait anywhere from 2 to 90 days. Patience pays off here—cutting the test short can lead to unreliable data.
Step 5: Seal and Send Your Test for Analysis
Once the test period ends, seal the device as instructed and mail it to the designated lab right away. Most labs will email or mail your results within a week.
Step 6: Read and Interpret Your Results
Your report will show your home’s radon level in picocuries per liter (pCi/L).
- Below 2 pCi/L: Excellent—no action needed.
- 2–4 pCi/L: Borderline—consider follow-up testing.
- Above 4 pCi/L: Take immediate mitigation steps.
If your short-term test shows high levels, confirm the results with a long-term test or professional assessment.
What to Do If Your Home Has High Radon Levels
Finding out your home has high radon levels can be scary—but don’t panic. Radon mitigation systems are highly effective and can reduce levels by up to 99%.
Here’s what to do next:
- Contact a certified radon mitigation professional.
- Look for experts certified by NRPP or National Radon Safety Board (NRSB).
- Get a mitigation plan.
- A contractor will evaluate your home and design a system tailored to your foundation and layout.
- Install a mitigation system.
- The most common solution is a sub-slab depressurization system, which uses a vent pipe and fan to draw radon from beneath your home and vent it safely outdoors.
- Re-test after installation.
- Always confirm the system is working effectively by conducting a follow-up test within 30 days.
How Often Should You Test for Radon?
The EPA recommends testing:
- Every 2 years for ongoing safety
- After any home renovation or foundation repair
- Before and after installing a mitigation system
Even if you’ve tested in the past, changes in soil conditions, weather patterns, or ventilation can cause radon levels to fluctuate over time.
Simple Ways to Reduce Radon Levels Naturally
While professional systems offer the most reliable results, you can take a few simple, natural steps to help lower radon levels:
- Improve ventilation in basements and crawl spaces
- Seal visible cracks and openings in floors and walls
- Use a dehumidifier to reduce indoor humidity
- Open windows during mild weather for air circulation
- Install a passive radon system if building a new home
These steps can help, but remember: they are not substitutes for professional mitigation if your test results are high.
Radon Testing Myths—Busted!
Let’s clear up some common misconceptions about radon testing:
- ❌ Myth 1: “My home is new, so it’s safe.”
- ✅ Truth: New homes can actually trap radon more efficiently due to tighter construction.
- ❌ Myth 2: “Only certain areas have radon problems.”
- ✅ Truth: Radon has been found in every U.S. state and in millions of homes worldwide.
- ❌ Myth 3: “If my neighbor’s house is fine, mine must be too.”
- ✅ Truth: Radon levels vary dramatically from one home to another—even next door.
- ❌ Myth 4: “Testing is expensive and complicated.”
- ✅ Truth: Testing is easy, inexpensive, and often takes just a few days.
Conclusion: Take Action and Breathe Easier
Radon might be invisible, but protecting your family from it doesn’t have to be complicated. With just a simple test, you can uncover whether your home is safe—or if it needs attention. Whether you choose a quick DIY kit or a professional test, what matters most is taking that first step.
By making radon testing a regular part of your home maintenance routine, you’re not just ticking a box—you’re investing in your family’s long-term health and peace of mind.
Visit Radon Testing and Mitigation PNW to learn more about easy, affordable testing and mitigation solutions for your home.