Think your 3D printer’s build volume is fully used? Most people leave space—and print potential—untapped.
After years of hands-on printing and troubleshooting, I’ve learned small changes can unlock big results. Whether you're printing at home or aiming to run the best 3D printer for small business, using every inch of your print bed matters.
In this guide, I’ll show you how to maximize your 3D printer build volume like a pro with simple, effective tips anyone can follow.
Unlock Every Inch of Your 3D Printer Build Volume for Bigger, Faster, and More Cost-Efficient Prints
Most people don’t use their printer’s full build space. Small details—like bed clips, sensor positions, or cable slack—can quietly eat up valuable room. But when you unlock that full area, the benefits add up fast.
You can print more parts in one go, reduce print sessions, and save time and electricity. For hobbyists, that means less waiting. For small business owners, it means higher output and better margins.
Learning how to use every inch of your 3D printer build volume helps you work smarter—and make every print count.
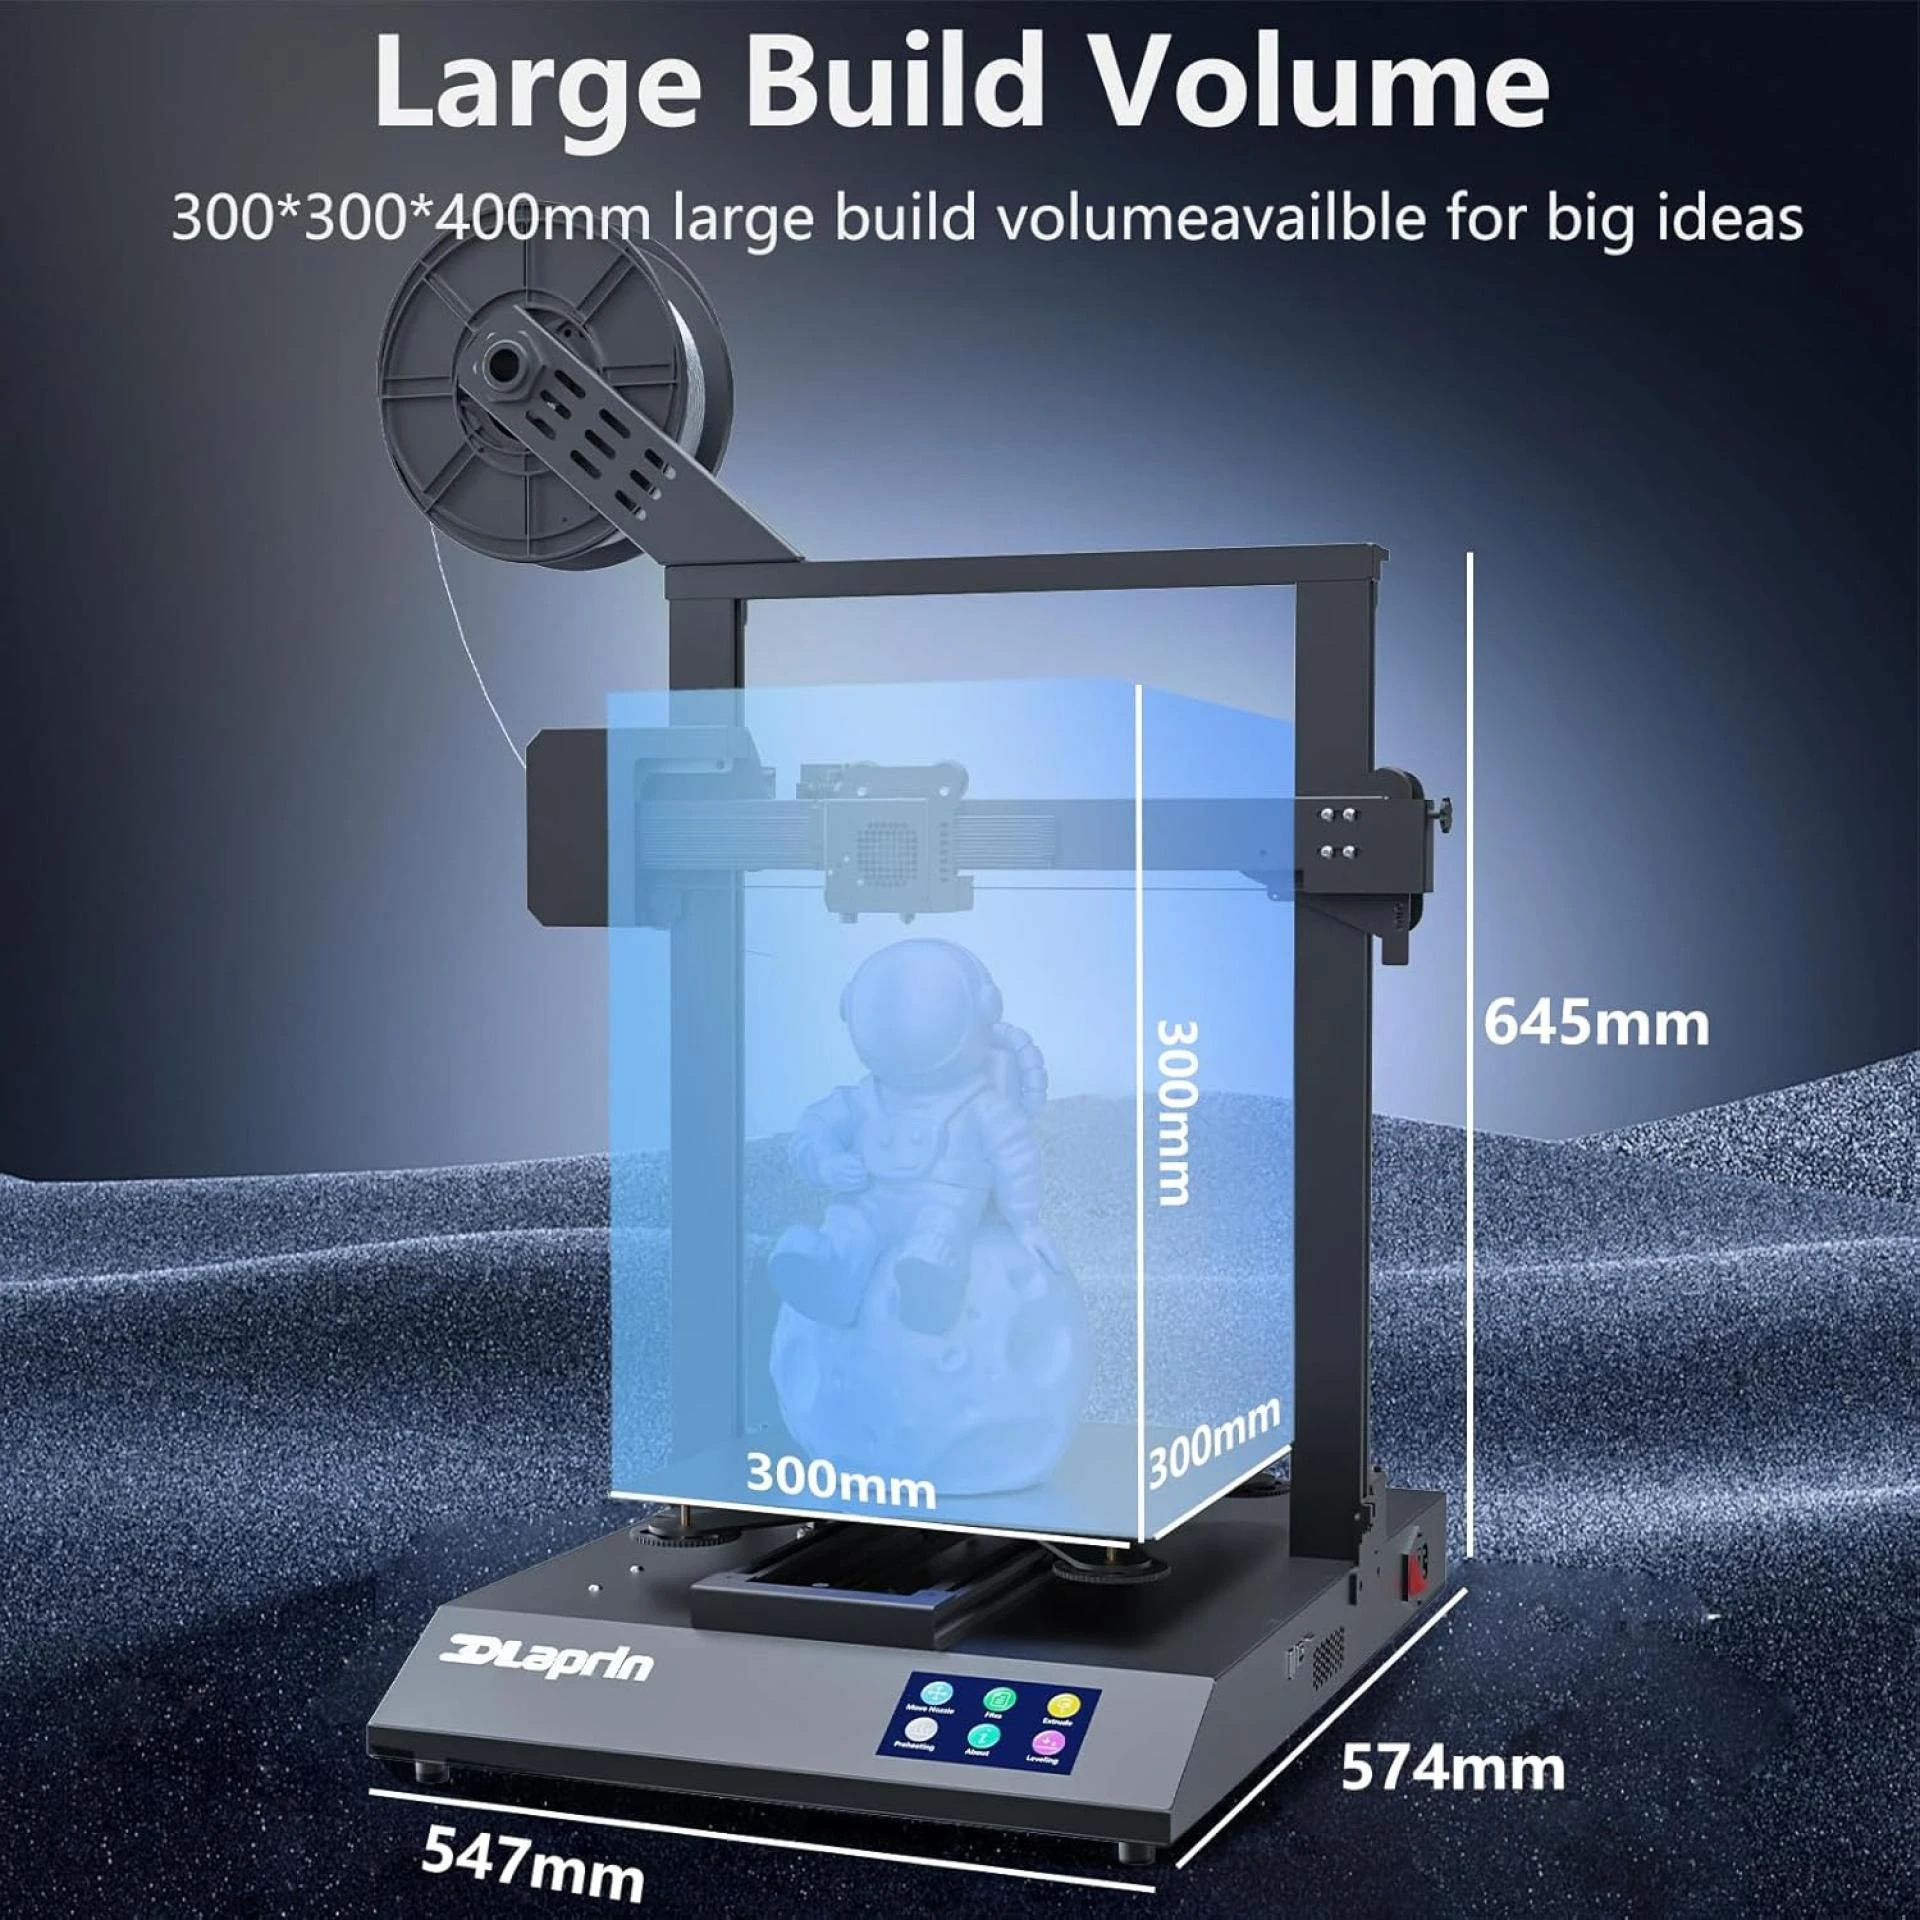
Know your true 3d printer build volume and why the spec sheet can mislead first-time owners
The build volume listed by manufacturers is often the maximum theoretical space. In reality, things like the gantry, wiring, and nozzle clearance reduce the actual print area. To avoid surprises, it’s important to measure and understand your printer’s true usable space.
Measure nozzle to gantry clearance and endstop offsets to discover the real print footprint
The nozzle can sometimes hit parts of the frame or gantry if you rely only on specs. Measure the space between your nozzle and the gantry rod carefully. Adjust your slicer settings to match this measured height. Also, double-check your endstop positions so the printer homes correctly and avoids collisions. This prevents failed prints and crashes.
Verify usable Z height by checking cable slack, spool position, and top-frame obstructions
Real Z height depends on more than just numbers. Cables that are too tight, spool holders mounted above, or frame parts near the top can all limit vertical travel. Slowly move your nozzle to the highest point and watch for any obstructions. Note this safe maximum height and use it in your printer settings to avoid trying to print beyond your machine’s true limit.
Calibrate the Machine Edge to Edge Before Any Large Format Job to Avoid Skew and First Layer Flaws
When printing large objects, accuracy matters most. Small misalignments can cause skewed prints or poor first layers. Calibrating your printer from edge to edge makes sure it moves correctly across the whole build plate. This keeps your prints precise and helps avoid problems that can waste time and material.
Square the Frame and Tighten All Corners so X, Y, and Z Stay Perfectly Perpendicular
A solid, square frame is the base of good calibration. If the frame isn’t square, the printer’s axes won’t line up right. This causes shifting and uneven layers. Check your frame often and tighten all corners. Use a simple tool to make sure the corners form perfect right angles. A tight frame reduces wobble and keeps your prints steady.
Run Mesh Bed Leveling or Tramming Across the Full Plate for an Even Foundation
After squaring the frame, your build plate needs to be level. Mesh bed leveling scans points on the bed and adjusts nozzle height for any uneven spots. If your printer doesn’t do this automatically, manually adjust the bed screws at several points. A level bed helps the nozzle stay at the right height everywhere. This makes the first layer stick better and avoids early print failures.
Optimize slicer settings to pack parts efficiently and exploit every corner of the build plate
To get the most out of your 3D printer’s build volume, start with smart slicer settings. Arranging your parts well helps you fit more prints in one go, saving time and material.
Rotate and nest models to lower Z height and fill horizontal space
Rotating models can reduce their height, making it easier to print multiple items within your printer’s limits. Nesting means placing parts close together on the bed without overlapping. This fills up empty space and lets you print more at once.
Use sequential printing or back-left start points to prevent nozzle crashes during tight layouts
When parts are packed tightly, the nozzle can crash into printed sections. Printing one part at a time (sequential printing) avoids this by limiting nozzle movement. Starting prints from the back-left corner also helps keep the nozzle clear of finished parts.
Design Smarter: Split Oversized Models, Add Alignment Keys, and Bond Parts for Seamless Full-Scale Objects
When your model is too big for your printer’s build volume, splitting it into smaller parts makes printing easier. To make sure the pieces fit back together perfectly, thoughtful design is important.
Add Pins, Lips, or Dovetails When Splitting Models So Reassembly Is Foolproof
Adding simple features like pins, lips, or dovetail joints helps guide the parts during assembly. These act as physical keys that keep pieces aligned and prevent shifting. This makes putting your model back together quick and accurate without extra measuring.
Choose Adhesives, Heat Stake Inserts, or Hidden Screws for Durable Joins
After aligning parts, pick a strong joining method for lasting durability. Use adhesives suited for your material, heat stake inserts for permanent connections, or hidden screws if you want parts to be removable. This way, your final model stays sturdy and looks seamless.
Keep wide prints stuck: dial in surface choice and temperature for edge-to-edge adhesion
Printing large, wide parts can cause edges to lift or warp because the plastic cools unevenly or doesn’t stick well. Choosing the right build surface and temperature helps keep your print firmly stuck from edge to edge.
Pick build surfaces (glass, PEI, textured plates) that stay flat when fully heated
Glass plates are smooth and stay flat at high temperatures, making them great for adhesion. PEI sheets offer strong grip and easy removal once cooled. Textured plates provide extra grip by creating tiny grooves that hold the filament better. Make sure your build surface stays flat when heated to avoid warping and poor adhesion.
Apply brim, raft, or draft shield tactics to fight corner lift on long spans
A brim adds a thin border around your model’s base to increase surface area and grip. Rafts create a thicker base under the entire print for better stability on large parts. Draft shields act as barriers to protect your print from drafts and sudden temperature changes that cause warping. Using these simple tricks along with the right bed temperature helps keep wide prints stuck and reduces warping.
Firmware and hardware tweaks that unlock hidden millimeters of 3d printer build volume (unique tip)
Sometimes your printer’s listed build volume isn’t the full story. Small firmware settings and hardware parts can limit the actual space you can use. Tweaking these can free up extra millimeters, letting you print bigger without buying new gear.
Raise software bed limits and adjust safe homing margins in firmware
Printers often have built-in safety margins that keep the print head from reaching the very edges. Adjusting firmware settings like max X, Y, and Z limits can unlock more space. Also, changing safe homing positions lets the nozzle get closer to the bed edges. Just be sure to test carefully to avoid crashes.
Swap bulky bed clips and tall hotend socks for low-profile versions to gain extra Z room
Thick bed clips and tall hotend socks add height and reduce your effective build height. Switching to slim clips and low-profile socks can give you a few extra millimeters vertically. These simple changes help you print taller parts without expensive upgrades.
Vertical stacking tricks to double part output inside the rated build volume (unique tip)
Want to print more parts without buying a bigger printer? Try vertical stacking. It means printing parts one on top of another, using your 3D printer build volume more efficiently.
Add temporary spacer supports so parts print in a neat tower without fusing together
Use thin, temporary spacers between stacked parts. They keep pieces separate during printing and are easy to remove afterward. This stops parts from sticking together and keeps them clean.
Plan cooling paths and support removal for easy post processing
Good cooling prevents parts from warping or fusing. Arrange your print to allow airflow around each part. Also, design supports that break off easily or dissolve. This saves time and effort after printing.
This simple technique helps you get more done faster, whether for hobby projects or small business needs.
Maintain motion system health when operating at full extension to preserve accuracy over time
Using your 3D printer at full build volume puts extra strain on moving parts. Without proper care, this can lead to less accurate prints and worn components. Taking care of your motion system keeps prints precise and your machine reliable.
Lubricate rails, lead screws, and idlers; retension belts before every big run
Keep rails and lead screws smooth with light lubricant. Check idler wheels too. Belts can stretch over time, causing issues. Tighten belts before large prints to avoid layer shifts and missed steps.
Tune jerk and acceleration so long moves don’t cause ringing or missed steps
Longer moves can cause vibrations or skipped steps if settings are too aggressive. Lower jerk and acceleration to balance speed and control. This keeps prints clean and reduces stress on your printer.
FAQs:
1. What is 3D printer build volume and why is it important?
Build volume is the largest size your printer can make in one print. It helps you plan what you can print.
2. Why can’t I always use the full build volume shown on specs?
Parts like the extruder, cables, or frame may block some space. Software and bed leveling can also reduce usable area.
3. How do I measure my printer’s real build volume?
Measure from the nozzle to frame edges and check for any cables or parts that limit movement.
4. What slicer settings help me use the full build volume?
Rotate and arrange models smartly, nest parts closely, and set safe start points to avoid crashes.
5. Can I split big models to print larger objects?
Yes, breaking models into parts with alignment features lets you print big things in pieces and assemble later.
6. How do I keep large prints stuck to the bed?
Use the right build surface, adjust bed temperature, and add brims or rafts to stop edges from lifting.
7. Can firmware or hardware tweaks increase build volume?
Sometimes adjusting software limits or swapping bulky parts for smaller ones gives a bit more space.
8. How do I avoid quality issues when printing at build volume edges?
Keep your printer calibrated, lubricated, belts tight, and tune motion settings to reduce vibrations.
9. What is vertical stacking and how does it help?
Printing parts stacked with spacers lets you make more pieces in one print without needing a bigger bed.
10. How often should I maintain my printer when printing large parts?
Check belts, rails, screws, lubricate moving parts, and tighten the frame regularly to prevent wear.
Conclusion
Maximizing your 3D printer build volume lets you create bigger and more detailed prints without extra costs. By knowing your printer’s real limits, keeping it calibrated, and adjusting slicer settings, you get the most from every print. Simple steps like splitting large models, improving bed adhesion, and maintaining smooth motion help ensure great results. Whether you print for fun or business, these tips save time and reduce waste. Treat your build volume as valuable space—it’s your key to smarter, more efficient 3D printing.