


Concrete is tough—but even the strongest slabs eventually show signs of wear. Whether it’s the driveway, patio, walkway, garage floor, or foundation, cracks are one of the most common issues homeowners face. And while a small crack may not look like an emergency, it can quickly grow into a costly problem if you ignore it.
The good news? You can repair most concrete cracks yourself, as long as you follow the right steps and use the right materials. This guide walks you through a clear, beginner-friendly, step-by-step repair process built to restore your concrete’s strength, appearance, and durability.
Let’s jump in—your concrete fix starts now.
1. Why You Should Fix Concrete Cracks Immediately
Concrete cracks might seem harmless, but here’s what happens when you leave them alone:
- Water seeps in, causing expansion, erosion, and deeper damage
- Cracks get wider due to soil shifting and temperature changes
- Weeds grow inside and make cracks even worse
- Edges crumble, leading to costly repairs
- Curb appeal drops, making your home look neglected
Fixing a crack early means a faster, cheaper, and longer-lasting repair.
2. Step 1: Identify the Type of Concrete Crack
Before you repair anything, you must know what kind of crack you're dealing with. Each type requires a specific method.
Common crack types include:
- Hairline cracks – thin and shallow
- Medium cracks – wider than hairline, but still manageable
- Deep structural cracks – more serious and sometimes require a pro
- Settlement cracks – caused by soil movement
- Shrinkage cracks – form as concrete cures
Pro Tip: Measure the width.
Cracks less than ¼ inch can usually be repaired with basic DIY products.
Cracks wider than ½ inch may need a more advanced fix.
3. Step 2: Gather the Right Tools and Materials
Having the right supplies makes repair easier and more effective.
You’ll need:
- Wire brush
- Chisel and hammer
- Shop vac or blower
- Pressure washer (optional)
- Concrete crack filler (liquid or patch compound)
- Trowel or putty knife
- Concrete sealer
- Protective gloves and goggles
Choosing high-quality products ensures a durable repair that won’t fail after the first rainstorm.
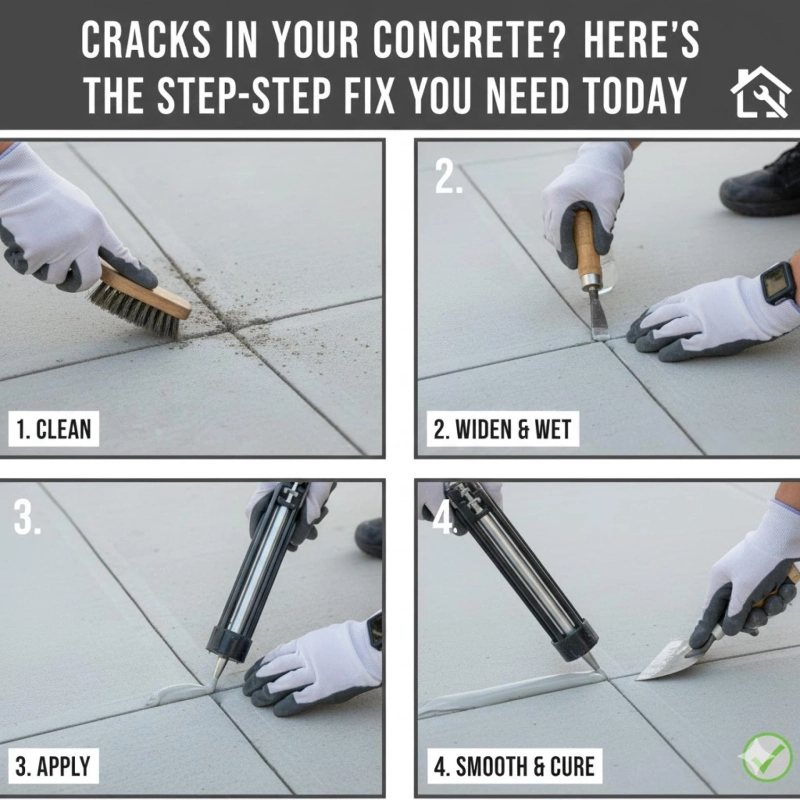
4. Step 3: Clean the Crack Thoroughly
This step is non-negotiable—dirty cracks can’t hold filler.
How to clean your crack properly:
- Scrub the inside with a wire brush to remove loose debris.
- Use a shop vac to blow or vacuum out dust and dirt.
- If needed, use a pressure washer to flush out stubborn particles.
- Let the crack dry completely before applying filler.
A clean surface ensures your repair bonds strong and lasts years.
5. Step 4: Widen the Crack (If Needed)
This might seem strange, but widening a crack slightly helps filler grip better.
Do this if your crack is:
- Wider than ¼ inch
- Deep or uneven
- Already flaking or crumbling
Use a hammer and chisel (or grinder) to create a U-shaped groove. This gives your filler more surface area to bond to—resulting in a stronger repair.
6. Step 5: Apply the Right Concrete Repair Product
Now it’s time to fill the crack. The best product depends on the crack type.
For hairline cracks:
Use a liquid crack filler or masonry sealer designed to seep into small openings.
For medium cracks:
Use a pre-mixed concrete patch or polymer-modified repair compound.
For wide or deep cracks:
Use epoxy or polyurethane injection for maximum strength.
Application steps:
- Load your filler or patch into a caulk gun (if needed).
- Squeeze product into the crack slowly.
- Use a putty knife to press it in and remove air pockets.
- Smooth the surface so it blends with surrounding concrete.
- Let it cure for the recommended time.
Always read the product instructions carefully—curing times vary.
7. Step 6: Smooth and Level the Surface
Once filled, the surface needs to be leveled before it dries.
How to do it:
- Use a trowel or putty knife
- Follow the natural shape of the concrete
- Remove excess filler
- Avoid leaving bumps or dips
A smooth patch helps your repair blend in and restores curb appeal.
8. Step 7: Seal the Area to Prevent New Cracks
This is the step many homeowners skip—and regret later.
A quality concrete sealer protects your repair from:
- Water
- UV rays
- Weathering
- Salt and chemical damage
- Freeze-thaw cycles
Apply the sealer once the repair is fully cured, and reapply every 2–3 years for ongoing protection.
9. Step 8: Inspect Your Concrete Regularly
Concrete maintenance doesn’t end after the repair.
Check your concrete every few months for:
- New cracks
- Shifting or sinking areas
- Crumbling edges
- Water pooling nearby
Catching issues early keeps repairs easy and affordable.
10. When You Should Call a Professional Instead
DIY is great for small to medium cracks—but some repairs need an expert.
Call a professional if you notice:
- Cracks wider than ½ inch
- Vertical displacement (one side is higher than the other)
- Concrete sinking or lifting
- Water damage near your foundation
- Repeated cracking in the same spot
These issues often signal deeper structural problems that DIY fillers won’t solve.
Conclusion: Fix Your Concrete Cracks Today and Protect Your Home
Concrete cracks aren’t just cosmetic—they’re early warning signs that your surfaces need attention. With the step-by-step repair process above, you can confidently fix most cracks on your own and prevent them from growing into expensive problems. And if you prefer professional help, trusted experts like https://www.concreteprosbend.com/ can ensure the repairs are done quickly and correctly.
By properly cleaning the crack, choosing the right filler, applying it correctly, and sealing the repaired area, you’ll restore both the strength and beauty of your concrete—protecting your curb appeal and your home’s value.