How to Build a Temporary Wall
You’ve got a project that’s just too big for the space you have, or maybe you’re in the middle of a remodel and don’t want to deal with the mess for weeks on end. Whatever your reason is, there are times when building temporary walls for home is just what you need. There are lots of ways to do it: brick, plywood paneling… even cardboard! Here’s how to build one using drywall.
Determine the wall’s purpose.
Before you get started, it’s important to determine the wall’s purpose. What is the wall needed for? What is the wall intended to do?
- Is it needed as a divider between two rooms in a house?
- Does it need to be soundproofed so that it doesn’t disturb neighbors or roommates?
- Will it be used as a display shelf in your spare bedroom?
Design and draw the wall.
- Draw a blueprint of the wall.
The first step to building a temporary wall is to design and draw it. You can do this on paper, or use your computer—just make sure that you’re able to scale the dimensions of your design (that is, smaller or larger) for when you begin construction.
- Use a tape measure to measure the walls.
Once you have drawn up your plans for what kind of wall you want and how big it should be, it’s time to start constructing! To make sure everything fits together perfectly, we recommend that before beginning any work on-site that all measurements are made by hand using an accurate measuring tool like a tape measure or ruler. This will ensure even distribution throughout all parts and avoid any uneven results later on in construction.”
Buy the materials needed.
Before you begin the construction process, you will need to purchase the necessary materials. These include plywood, lumber (typically 2x4s), drywall, screws, nails, and tape. You can find these materials at your local home improvement store in bulk or as individual pieces. If you buy in bulk, you may be able to save money on shipping costs and help reduce waste by purchasing only what is needed for each step of this project.
Install the framing (studs): Part One
- Install the framing (studs)
A temporary wall can be built using drywall or plywood, but you’ll need to install metal studs to support the material you’re using. It’s best to use metal studs because they provide a more stable base than wood, which can shift and warp over time.
The first step in building a temporary wall is installing your metal framing (studs). To do this, follow these steps:
- Use a level to make sure the studs are straight. You’ll have a better-looking product if you take care in this step!
- Use your finger or thumb as a guide for spacing between each stud—you want about 4 inches of space between them when finished. You may need some help from an assistant if one isn’t available at home!
- Once all of your spacing has been determined and marked up with pencil lines on either side, proceed with installing screws into each individual stud prior to attaching them together into longer sections until finally assembled into one solid unit complete with both corners made out of two 90 degree angles connected back-to-back so that they form an enclosed box shape rather than just being open airy space filled only halfway up with nothing more than insulation material filling in gaps where there should be something solid instead.”
Add drywall to make the wall panels.
Build the wall panels with drywall by adding them to the framing. The first step is to measure and cut the sheets of drywall using a drywall saw. Attach each sheet of drywall with screws from a drywall screw gun, making sure that no gaps between pieces remain. Sand down any rough edges or seams using sandpaper, then apply joint compound over any seams for a smooth finish.
Finish the panels with paint or wallpaper.
- Paint the back of your panels. You can paint the wallboard itself or apply it to a piece of plywood. This will cover up any imperfections in the drywall and make it easier to paint later.*
- If you want something more durable than paint, use wallpaper instead. You’ll have to buy special paste for this process, but it’ll last much longer than regular paper.*
Brace and anchor the wall in position.
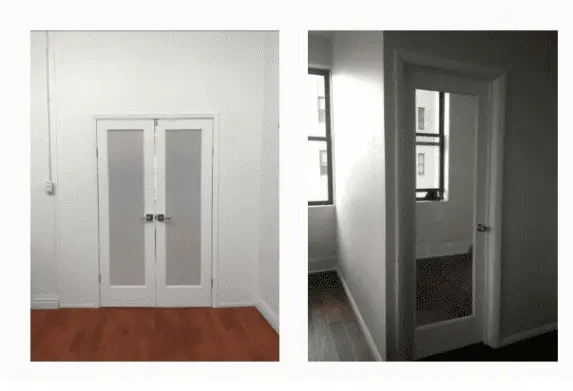
If you’re looking for a temporary wall, one of the best options is to use a Manhattan pressurized wall. This type of wall is made from a lightweight material that can be easily installed and removed.
When you’re building a temporary wall, you must make sure that it is firmly attached to the ground. You can do this by using concrete blocks as braces and anchors for your walls. If you are installing your wall in a basement, then use the drill to anchor it to the foundation as well.